So back again.
In this post we’ll look at installing the Platform Services Controller (PSC).
Forgetting about ESX for a minute, this new iteration of vSphere is, in my opinion, a huge leap forward for administrators. It feels like the virtual appliance architecture has finally come of age. The split of duties makes a great deal of sense. The PSC is responsible for Single Sign On (SSO), Licensing, and as a Certificate Authority, while the VCSA hosts the inventory service, the web client and others.
So why on different appliances for this lab? Well going forward, in future blog posts, we’ll look at connecting a second VCSA to the PSC.
This first VCSA and PSC will lay the foundation for this and future labs
OK onward.
To install the VCSA and/or PSC you you will need to install the VMware client intergration plugin. can be found in the iso at vcsaVMware-ClientIntegrationPlugin-6.0.0.exe. To be honest I’m still not 100% sure why this is needed. I’ve seed similar functionality using HTML5.
This part of the installer does assume that you have a DC up and running. If you don’t you should get one setup before continuing as we will need it later, if you choose to follow that part of the guide.
Once that’s done we can fire up the installer and get the PSC installed.
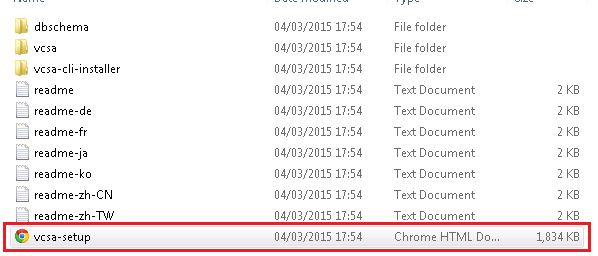
Firstly unpack the ISO to your local drive. C:/temp for example.
1. Double click on vcsa-setup.html. (found in the unpacked ISO).
2. Your browser might ask for confirmation before staring the Client integration plugin. Accept the caution.
3. Select Install
4. Select “I accept the terms of the License Agreement”. Click Next.
5. Enter in the IP address, username (usually root) and the password of the ESXi server you are deploying the PSC to.Click Next.
6. Enter in the name of the PSC and give it a password. Click Next.
7. On this screen you have three choices. For our lab we’ll select “Install Platform Services Controller”. Click Next.
8. Select Create a new SSO Domain. Select a password for the SSO domain. This is different from the appliance root password, which is for the OS. If you don’t write down your lab passwords ,choose something easy to remember, We’ll need this password later. Enter in the SSO Domain name as vsphere.local and the site name as -site-1. Click Next.
9. Appliance size… Well nothing to choose here… Click Next.
10. Select the datastore you want to deploy the PSC onto. The SATA drive should be fine for this as it’s a relatively small appliance.
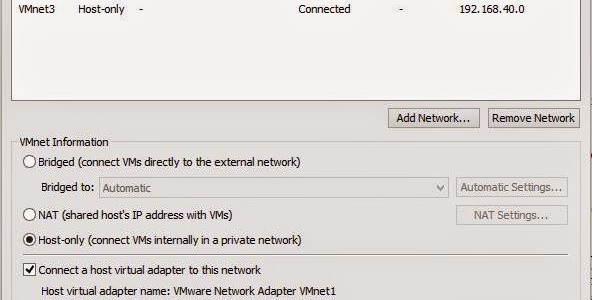
11. Networking is King here and you’ll need to be vigilant going through this. For the time sync select “Synchronize appliance with ESXi host” and tick “Enable ssh”. Click Next.
12. Check and check and check your settings. Once you are happy, Click Finish.
13. The installer will now go off and setup the PSC on your ESXi server.
That’s the first bit done. Next post is the VCSA installation.