Getting William Lam’s Awesome ESXi 6.5u1 Virtual Appliance to run in Fusion and Workstation (The Lazy Way!)

William Lam, The Official (to me anyway) master of nesting just about everything, has been putting together ESXi virtual appliances for quite some time.

You can find them over here:

Before you read on, please note that all the hard work has been done by William Lam and if you live under a rock and haven’t come across his website  before please go and check it out over at https://www.virtuallyghetto.com.

Honestly, once you’ve rebuild your lab more then twice the novelty wears off fast. That’s what makes these appliances are incredibly convenient.. It takes literally 2-3 minutes to have a fully functioning deployed Nested ESXi host, with all the little bits and pieces of config and vibs you would normally have to go in and setup yourself. Only one small problem, while it deploys into ESXi just fine and dandy, it doesn’t deploy onto fusion/workstation because it has virtual hardware that just isn’t compatible with Fusion/Workstation. 🙁

BUT the 6.0u3 VA does deploy without a problem.

Lazy Method:

  1. Download both the ESXi 6.0 Update 3 Virtual Appliance and the ESXi 6.5 Update 1 Virtual Appliance.
  2. To keep things neat create two folders called “ESXi6.0” and “ESXi6.5u1”.
  3. Extract both OVA’s into their respective folders. You can do this with with winrar (on widows) or if you’re using Linux/Max, from the console move into the directories and run “tar -xvf <name_of_ova>”
  4. Browse into ESXi6.5u1 and delete the ovf file.
  5. Copy the ovf file from ESXi6.0 to ESXi6.5u1. 
  6. Using your favourite editor open Nested_ESXi6.0u3_Appliance_Template_v1.0.ovf
  7. Do a search and replace for anything that reads “Nested_ESXi6.0u3_Appliance_Template_v1.0” with   “Nested_ESXi6.5u1_Appliance_Template_v1.0”
  8. Save “Nested_ESXi6.0u3_Appliance_Template_v1.0.ovf”
  9. Rename “Nested_ESXi6.0u3_Appliance_Template_v1.0.ovf” to “Nested_ESXi6.5u1_Appliance_Template_v1.0.ovf”
  10. Delete “Nested_ESXi6.5u1_Appliance_Template_v1.0.mf”
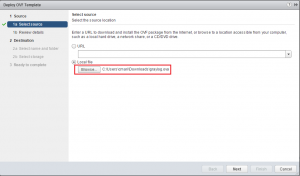
  11. Import into Workstation or Fusion
  12. Once the Nexted ESXi host has booted for the first time and run the config scripts. You’ll need to power it down and set VT-x/EPT support for the virtual machine. (I’ll add it in to the ovf instructions soon).

It’s really that simple (or lazy)!!!


PBM Error migrating VM’s from VSAN Datastore

Occasionally, and by that I mean very rarely, VM’s can refuse to migrate on or off VSAN storage (I know, I know, why would you every want to migrate off VSAN?).

The error will look something similar to:

A general system error occurred: PBM error occurred during PreMigrateCheckCallback: pbm.fault.PBMFault; Internal error during SPBM validation;
No VASA Provider for schema namespace (VSAN) found.

You’ll also find that you can’t create new storage providers.

The official reason is: Official: This issue occurs due to inconsistent data between the Storage Management Service (SMS) and the Storage Based Policy Manager (SPBM).

While VMware claim that this is only an issue with VSAN 5.5, I have seen it occur in VSAN 6.0. To be fair it was in my lab, and I was testing “dirty” power down of VSAN hosts.

So to the Fix

NB: As this is a VASA related issue it might work for other storage providers too. In the testing I’ve done its been non-disruptive but as always proceed with caution.

  1. In the vSphere Web Client Navigate to the vCenter Server (Not the VSAN Cluster)
  2. Select the Configure tab on the right.
  3. Select the Storage Providers Menu Item.
  4. In the Storage Providers window pane: click the storage icon with the red circular arrows. 
  5. Once done, the Cluster with VSAN will be scanned and you should be able to move your VM’s about.

VCAP6-DCV Design beta exam review.

On Saturday the 5th of March, I had the pleasure of sitting the beta of the VCAP6-DCV design exam.

Since more exam centers are now able to host the exam I chose a center near me, which was really convenient as they are also open on a Saturday. After passing all the usual security checks and getting shown to my seat and logging in, the familiar NDA popped into view and I was away.

The beta exam was 4 hours and I finished with time to spare. Was the exam difficult? Sure, but there were no questions that were outside the blueprint.

Most of the experience was a massive improvement over the VCAP5 exam. No lag, fast, and easy to navigate. However every silver lining has a cloud, in the middle of one tricky design question, everything locked up and up popped an error with the Pearson exam engine. I signaled to the exam monitor that I had a problem. She spent the next few minutes on the phone with an incredibly unhelpful Pearson. They claimed that everything but themselves was to blame. Suddenly, as soon as it began the problem mysteriously resolved itself. Weird *cough* Pearson messed up *cough*. One or two of the questions were also incomplete and didn’t provide all the info I needed but I did add notes and suggestions where appropriate so hopefully that will help.

If I’ve managed to do enough to pass I’ll get myself lifted to the VCIX-DCV cert, which would be a bonus.

Exam Tips:

  • The exam itself is filled with all the new vSphere 6 goodness, so if you’ve just passed the VCAP5-DCD and are expecting to walk this exam you’ll most likely waste your money.
  • As is obvious from the many blogs about, the VMware design exams are difficult but not impossible.
  • Having design experience is ideal but not essential. You can work this to your advantage which I’ll explain in a bit.
  • If you think the question or scenario is incomplete, there is the option to add a note to any question.
  • Get a lab together, it you can. There are cloud services out there you can use to run a virtualised lab.
  • Don’t allow yourself to get rattled. If you are struggling, flag the question for review and come back to it later.
  • Put a study plan together based on the official blueprint. There is a large body of information to absorb so make sure you budge your time appropriately.
  • Know your Requirements, Risks, Assumptions, and constraints.
  • Some scenarios have a large amount of information, some relevant to the design, some not, but all must be considered. Take notes while reading the question or scenario and focus on what they’ve asked you. It’s a valuable time saver.
  • If you have time at the end of the exam, use it to review your questions but try not to second guess yourself.

And finally as I mentioned before, if you don’t have real world design experience make it work to your advantage. Wait, what, how’s that? As anybody who’s run through a few designs know, there’s usually more than one way to skin a cat. Well VMware likes you to do your designs in a specific way and they have certain methodologies and ways of looking at the world. For example, the whole upstream, downstream, thing drives me crazy, and different companies either consider the user upstream or downstream. If you learn how to do designs the way VMware wants you to, without outside influence, it’ll be easier to visualise what they are after.

I’ve often heard techies who’ve sat this exam complain that technical designs are subjective, but it shouldn’t really be the case here. It’s a VMware exam and should be done the VMware way. Follow the blueprint, read the study guides and provided you also put in the study time, you’ll do just fine.

Veeam Backup Free Edition – Install

Just over a couple of weeks ago now, Veeam released version 9 of their product suite. Most notable of those are Veeam Backup & Replication and Veeam One (their monitoring and backup products)

Veeam have done an amazing job with their backup product and it wasn’t too long ago that if you wanted to backup your VM’s then Veeam was the only realistic choice. The other backup vendors are catching up and more choice is starting to appear in the market but Veeam still have the edge and because of this are the clear leaders, in my opinion, for VM backups.

What Veeam have always done, as far as I can remember, is offer free versions of their products. There are limitations,  of course, but you can still monitor and backup the products. Where I used to work we used the free version of Veeam One for quite a while before we made the jump to the paid version.

With the free version of the backup product you can only backup one VM at a time in the GUI, which could be cumbersome. In addition it doesn’t work on the free version of ESXi. I’m guessing that VMware called in a favour there. However you can do some scripting around this as sometime last year Veeam decided to allow some powershell CMDLETs to be called in the free version. This is great because you can now script around the limitation of “one VM at a time” and I use this script myself to backup my home lab. For a small shop, home lab, small engineering environment its perfect. I tend to do some fairly destructive things to my lab and this saves time rebuilding.

However I would still recommend going with one of the paid for versions if you are looking at backing up VM’s in a production environment. There is much goodness and value in the paid versions.

Installing Veeam Backup Free edition V9.

Before you continue you’ll need to go to Veeam’s website and create an account to download the Backup software ISO. The ISO is large at 1.2TB. I’m using a Windows 2012 R2 server for this install guide and it allows me to mount an ISO as a virtual DVD. If you are using an older version of windows you’ll need to extract the ISO.

  1. Right click the ISO and select mount.veeam_free_7
  2. Browse to the mounted ISO and double click Setup.
    veeam_free_8
  3. If you get a User Account Control warning click yes.veeam_free_9
  4. Click on the Backup and Replication panel.veeam_free_10
  5. If, like me, you skimp on resources in your lab you’ll get this message. Click Yes.veeam_free_11
  6. One of the cool features of the Veeam installer is that it actually offers to install the missing requirements. Click OKveeam_free_12veeam_free_13
  7. Once the .NET requirement is met the installer starts. Click Next.veeam_free_14
  8. Select “I accept the terms in the license agreement” and click Next.veeam_free_15
  9. If you have a license key you can click Browse and select it but as we are using the free version you only need to click Next.veeam_free_16
  10. The default on this window is to have all three features selected for installation, however you can decide not to install the console for example. I have left the three features enabled. Select Next.veeam_free_17
  11. Again, trying to make things as easy as possible by offering to install the missing requirements. If you, like me didn’t have them installed, select Install.
    veeam_free_18
  12. Once the requirements have been met, click  Next.veeam_free_20
  13. The default configuration should work for most free installs, for most licensed installs too, but its good to have to option there if you need it. Click Install.veeam_free_21
  14. Once the update is done click Finish.veeam_free_23
  15. On your desktop you’ll now have the Veeam Backup & Replication Console icon. A quick double click will open up the login screen for Veeam Backup.veeam_free_24

So really easy and simple. Most people don’t really think about the installer for an APP but I’m always impressed that its so simple with veeam. How many times have you had to go and download an obscure patch or track down a particular version of .NET. Many vendors could learn a thing or two here, yes NetApp, I’m looking at you..

VMware designs using Mindmaps

I was introduced to mind maps at school as a way to take notes during class but never really worked with them. Earlier in the year, while studying for my DCD I happened to see somebody at the library referring to a mind map while they were working.

That got me thinking; mind maps are quite personal as in you put it together. In effect, its your mind map, its put together in a way that you can reference information clearly as it relates to how you have stored it in your mind.

I was going through Jason Grierson excellent DCD 5.5 Study pack at the time and decided to create a series of mind maps from the info. This allowed me to very quickly go and look for the detail I needed. If you are studying towards your DCD the DCD 5.5 Study pack is a really good collection of information that you should download and go through.

Lets take a look at the map I created for the three different types of designs that VMware references. This is quite a small map but allowed me to quickly get the differences between Conceptual, Physical, and Logical designs.Design_Types

The next map looking at the four design factors has a bit more detail giving examples and definitions of risks, assumptions, constraints and, requirements.

Design_Factors

And as a better example this map dives into the design requirements of manageability, recoverability, availability , security, and performance. Still not a big mind map by any means (the ones I’ve been working on for my VCDX are getting a bit on the big side).

Design_Requirements

Many of the maps I create will only ever be seen by me. I use them as references when working on designs. Actually I’ve been using them for any projects I now have, both professional and personal. I’m looking at doing some work on my kitchen and this tool has helped keep all my ideas together in a way that I can easily reference them.

The reason I chose to show these maps is to give you another tool when putting together designs and working out what the client/your boss is trying to get you to do.

The software I use to create my maps is Simplemind. It’s avaliable for PC, MAC, Android, and IOS. There is less featured free version for IOS and Android. The map can be shared through all platforms via Dropbox.

Book Review – Essential Virtual SAN

VSAN
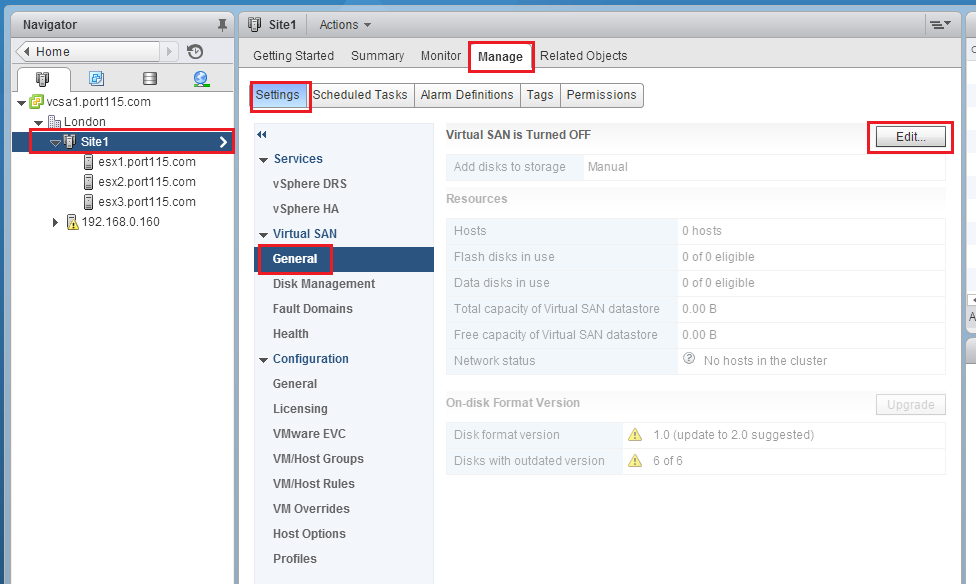
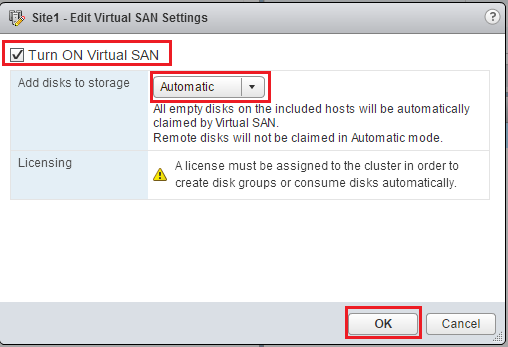
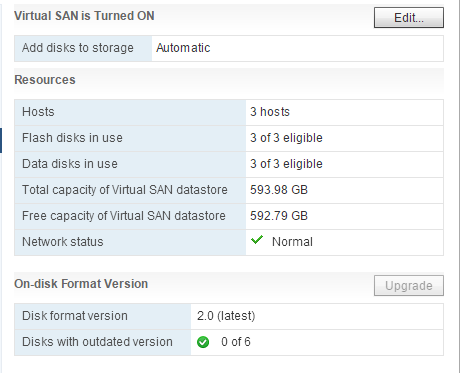
I have a confession to make. I am a Virtual SAN junkie. From the performance, to the expandability, to the simplicity, it’s an amazing product. The whole concept makes me wonder why the big storage players didn’t come up with the idea first.

Looking forward, the future forVSAN is very bright. This is a massive development and I think it will have wider reach than NSX. It’s so easy to get up and running, that a business of any size could spin it up with little effort. Just don’t forget to validate against the HCL.

Now, if you are happy with that and don’t really intend to do much with it then click away now, but if you want to understand more about the technology you are running then Duncan Epping and Cormac Hogans book Essential Virtual SAN is one of the best resources you can sink your money into.

Before we carry on, one thing to note is that this book is written around VSAN 1.0. While VSAN 6.1 is out it’s not 6 versions further on but more like 1 full release and 1 point release further on. VMware changed the version numbers to reflect the vSphere versions. So that said, this book isn’t obsolete. Far from it. The new versions really only build on what is already an amazing platform. It is still completely relevant, just missing some new goodies, like stretched clustering and info about the updated file system. For all the updated info have a crawl through Cormac’s blog and the VMware Technical Papers.

I’ve ready a couple of Duncan’s other books, the vSphere 5.1 Clustering Deep dive written with Frank Denneman for example,and found them to be very easy to read. Often a book aimed at techies can be very dry, which makes then a struggle. Cormac is Mr VMware Storage and his blog, read by many people, is always informative and good to read.

Essential Virtual SAN on the other hand reads well. The sections are well thought out and the book takes you from introducing VSAN all the way through to using the vSphere ruby console to look in real detail at what the individual disks are doing.

The authors do state that this is not a starters guide, while they are right, I found this book to be more than enough for both beginners and the more experienced to really find useful.

Duncan and Cormac’s enthusiasm for VSAN really comes through in this book. Obvious, I know, when you look at their blogs, but it does feel like this is more than a 9-5 for them.

At the office we have recently deployed VSAN. This went through the usual steps of putting it in engineering, running a successful POC and finally getting senior management buy in to roll it out. This book was a huge help in helping me boost my knowledge and fielding any concerns raised by the business.

I did attend the VSAN deploy and manage course, this book is better.

The future for VSAN is bright and, to me it’s clear that this should be on your roadmap, if it isn’t already.

Deploying the Graylog OVA – Easy

As a follow up to my previous post, I’ll go through deploying and configuring the Graylog OVA. It’s really, really easy. if face the whole process should only take about 20 minutes before you have a set-up ready to receive logs.

A typical Graylog appliance (OVA) deployment can be broken down into three parts, 1) OVA Deployment, 2) OS network configuration, 3) Configuring an Input.

1 – OVA Deployment.

  1. Log in the vSphere web client using an account that has permission to configure the environment.Lic-1
  2. Select Home and Hosts and Clusters.AH-1
  3. Right click the cliuster you want to deploy Graylog into and select Deploy OVF template.GL1
  4. Select Browse and select the Graylog OVA.GL3
  5. Select Next.GL4
  6. Give you Graylog OVA a name and select a folder for it to go into. Select Next.GL5
  7. Select a Virtual Disk Format. Choose a Storage Policy and a datastore to deploy the OVA into and click Next. NOTE: If this is going into production and you anticipate a large amount of logs to come in then you should set your disk format to be Eager Zero Thick.GL6
  8. Choose a network.GL7
  9. Review your setting and click Finish.GL9

vSphere will go off and deploy your OVA. The above process will take about 5 minutes.

2 – OS network configuration.

The Graylog OVA is based around Ubuntu and is configured with DHCP straight out of the box. If that doesn’t bother you skip this step.

  1. Open a console to the Graylog VM. Login using the username ubuntu and the password is ubuntu.GL10
  2.  Edit the interfaces file. (sudo vi /etc/network/interfaces). Hit enter.GL12
  3.  Delete iface eth inet dhcp and replace with the following (but customising to your network requirements). exit when done (:wq!)GL14
  4. Next we’ll tidy up the hosts file. (sudo vi /etc/hosts).GL15
  5. I’ve chosen to keep my hostname as Graylog so all I needed to do was change 127.0.1.1 to 127.0.0.1.GL16
  6. You’ll need to edit resolv.conf.GL17
  7. Set the nameserver entries to match the DNS servers in your environment. One for each DNS server you want to use. In addition set domain and search to match your domain.GL18
  8. Once you’ve done all of that run sudo graylog-ctl reconfigure. This will catch any change you have made that Graylog might rely on.

Its imporant to note here that the graylog-ctl script is quite versatile and allows you to make chages to Graylog, such as change your timezone and admin password, which should be done if you want to push this into a production environment,. Note: If you do make any changes make sure you run sudo graylog-ctl reconfigure.

OK so to be fair the above took me about 10 minutes to do, however if you are not familiar with Linux it’ll take longer but the Ubuntu community is very active and can help.

3 – Input Configuration.

So now we have our Graylog server ready to go, well almost. The amount of inputs that Graylog can receive is quite vast. In addition to the preconfigured inputs you can make your own. We’ll look at configuring the most common. the syslog input for both UDP and TCP.

  1. Browse to your Graylog server and, if it’s running you’ll be greeted with the login prompt.GL20
  2. In the menu bar across the top select System and Inputs.GL21
  3. From the drop down menu under Inputs in Cluster select Syslog TCP and click Launch new input. In the setting box all you need to do is give your new input a name (e.g. Syslog_TCP).GL22
  4. Setup the same for Syslog UDP.GL23

That’s really as difficult as it gets. Now you have the basic features set-up and configured all you need to do is point the infrastructure you want to log at it.

So the previous two posts only really scratch the surface of what is a really powerful tool. Being an opensource project,the code is readily available for anybody to look at. API;s are exposed and documented, dashboards and alerts can be configured, and custom inputs can be setup, to name a few.

Once more, Good work guys.

Nested Home Lab – Part 14 – Enabling VSAN.

We’ve done all the hard work. Now you’ll see how easy it is to actually enable VSAN. Once this is done you’ll have a lab ready to go.

  1. Log in using an account that has permission to configure the environment.Lic-1
  2. Select Home and Hosts and Clusters.AH-1
  3. Expand the Cluster you want to enable VSAN on. Select Manager, Select Settings,  Select (under Virtual SANGeneral, Select Edit.Add_VSAN_01
  4. Check Turn on Virtual SAN. Change the Add disks to storage to Automatic. Click OKAdd_VSAN_02
  5. You should now have a functioning VSAN cluster. Add_VSAN_04

NOTE: You will initially see the error below. Its normal and should clear in a minute or two. If it doesn’t you need to go back and edit your networking.Add_VSAN_03And that’s it. You can now load some VM’s and start testing. In earlier posts I recommended a couple of Linux distro’s, however I have been playing about with Photon and its a really good light weight alternative.

Have fun labbing!

VMworld – Day 4

VMworld has drawn to a close; battle wary attendees slumped in the corridors, faces bathed in the soft light of a million pixels,  or stumbling around looking for that one last elusive caffeine high.

Its_over

I arrived early to take a few minutes to get myself organised, and look at the notes from the previous three days. I had a few questions that I wanted to put to some of the VMware experts.

Session:  How to Manage the Health, Performance and Capacity of Your Data Center, using vSphere with Operations Management

Speaker: Himanshu Singh and Hicham (he-sham) Mourad

Unfortunately, this was rehash of their session from the day before (vRealize Operations Insight: Manage vSphere and Your Entire Data Center).

Session:  Horizon View Troubleshooting – Looking Under the Hood

Speaker: Matt Coppinger, Alex Birch

A good talk from guys in the field. Both of them are Brits so it felt like home. The two had an interesting dynamic, one would start and the other would elaborate. I’m working with View at the moment so this gave me some really good ideas.

Session: A First Look at vSphere Integrated Containers and Photon Platform

Speaker: Dan Wendlandt

I decided to round off the day with a DevOps session. I understand containers and I get why they are important to development but wow did this session stand out as one of the better ones for me. The demo of this technology was really cool. Photon was also talked about. Nicely done presentation.

4

After that Dimos and I went back to the solutions exchange and cornered Tomas a senior systems engineer from VMware and got him to show us everything we could think of about vROI. 60 minutes later Dimos left and 30 minutes after that I let Tomas get back to the other delegates.

My flight was at about 8pm so I got to the airport really early and amused myself by playing spot the VMware bag (36 if anybody’s interested).

VMworld – Day 3

Yes, yes, I know the post is late. I’ll do day 3 and release day 4 immediately after this one. My excuse? Family time.

Anyway back to Day 3.

Today, I was a really busy day. I had resolved to meet with a few people on the solution floor as well as attending as many sessions as I could.

Session: General Session

Speaker: Various

The two General sessions are worth a watch You can see them here

NSX 6.2 got a big mention with a really interesting customer story (look out for the customer with the funky jacket).

2A large part of the focus was talking about where VMware want to push NSX going forward. This is a really interesting space. While NSX can be very complicated, I believe bits of it going to make their way into other products.

Pat Gelsinger also can onto stage. What he had to say was quite interesting about companies needing to change and move forward or face being left behind. However the big elephant in the room wasn’t really talked about EMC/DELL. I was a bit disappointed but in hind site I agree that it wasn’t right to talk about that to the conference attendees before you spoke to the employees.

Session: Solutions Exchange

Dimos and I hit the solutions exchange. There were a few vendors I wanted to see and look at their products, Solidfire being one and HGST being another. Take a look at HGST if you get the change. Their products are very mature and very well priced. What was nice to see a lot more smaller companies participating this year too.

Session: Virtual SAN Customer Panel

Speaker: Rory Choudhuri

Another good session but this time with customers themselves giving updates of their experience with VSAN. This was very enjoyable and I managed to participate quite a lot.

1

Session: Stretched Clusters with Expert

Speaker: Lee Dilworth – Principal Systems Engineer , VMware

A much smaller meeting with seven of us and Lee. This was in the experts lounge and Lee took us through what to look out for in Stretched clusters, SRM, Stretched VSAN. Nice participation with the attendees.

Session: vRealize Operations Insight: Manage vSphere and Your Entire Data Center

Speakers: Himanshu Singh and Hicham (he-sham) Mourad

Good talk. Big focus on Log insight and the benefits of intelligent analysis. Both speakers had a good raport with their audience.

Session: VMware Virtual SAN – Architecture Deep Dive

Speakers: Christian Dickmann, Rawlinson Rivera

I was quite interested this. I wanted to see what had really changed under the hood between 5.5 and 6.1. Well it turns out a lot has changes. Both speakers really know their stuff but i was very impressed with Christian. Looking at how the snapshot process has changed (for the better) and the new Virsto on-disk format was quite cool.

After this I headed back to the sister-in-laws. I decided to give the VMworld party a miss and take the sister-in-law and her boyfriend out for dinner to say thank you for putting up with me for the past few days. We had dinner at a little Japanese restaurant called Yen in Gracia.