vExpert 2020!

vExpert 2020! What a great way to wake up.

Its been just over 5 years that I’ve had the honour to be a part of this amazing program. To those of you thinking about applying, go for it!

A big Congratulations to all the vExperts both new and current.

Just before I sign off, a thank you to my current employer and work colleagues for keeping me challenged and learning.
 

How to setup 2 factor authentication in Horizon View using Google Authenticator – Part 2

Adding the Radius Server to the Connection Broker.

I’ll always recommend using the Unified Access Gateway, even for internal only deployments and adding the first Challenge of the 2FA there. However we can add it the the connection broker if needed. The following is done via the HTML interface, it’s where the admin console is heading so you might as well get started now. Next post will be how to add it to the Unified Access Gateway.

  1.  Log into to your connection broker on https://<connection>/newadmin/
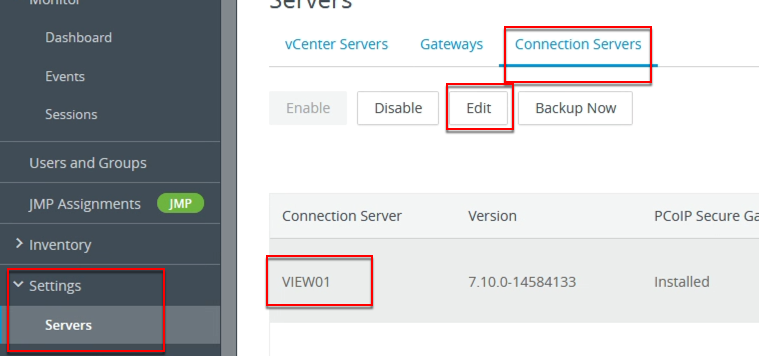
  2. Expand Settings and Click on Servers and Connection Servers.

  3. Select the connection server and click Edit.
  4. Select Authentication and scroll down to Advanced Authentication.
  5. Under Advanced Authentication:
    1. For 2-factor authentication select RADIUS.
    2. Tick Enforce 2-factor and windows user name matching.
    3. Under Authenticator, select Create New Authenticator.

  6. Fill in blank and required details. no real need to change the defaults:
    1. Label – Give it a name like Centos 2FA.
    2. Hostname/Address – hostname of the 2FA server we built in Part 1.
    3. Share Secret – We defined this in Part 1 as the secret in the client.conf file.
  7. Click Next.
  8. Add in the details of a second server (if created)
  9. Click Finish.
  10. Select the Authenticator you just created.
  11. and select OK.

Next time a user tries to log into the connection broker to get a desktop they’ll be prompted for their 2FA key.