Horizon View – Design and Considerations

During the last few posts we put together a SQL server, Connection Server, Linux desktop, setup certificates, and created a working Manual working desktop pool.. A Basic working deployment of Horizon View that’s good for kicking the tires but very labour intensive to maintain in production.

In a production environment there is much more to consider than just what we’ve thrown together. Availability, security, logging, monitoring, alerting, desktop pool. Desktop OS, budget, to name a few.

Before jumping in and creating an awesome design you’ll always want to find out exactly what the requirements are. “Because” is not an answer. For example, you should be asking questions along the lines of:

  • What do the different stake holders think they are getting?
  • What does your network look like?
  • What kind of security do you have between your networks and/or VLANs
  • Is redundancy and resilience a factor to consider, and yes, they can be different things.
  • Do you have approved Windows or Linux builds?
  • Patching schedule?
  • Do you have a standard user base, or is this intended for users with differing requirements? e.g. dev, eng, admin?
  • Does this service need to be available externally, or is it an internal service only?
  • Have you met with security?
  • Apart from the requirements, have you evaluated the risks and constraints?
  • In the absence of concrete answers have you made your clients/manager aware of any assumptions you’ve made? e.g. “The project plan assumes that the current in server disk controllers will be replaced with HPE P416ie controllers for VSAN compliance.”

When working out the Requirements, constraints, risks, and assumptions be specific. Ambiguous or open ended answers will lead to scope creep and make your job more difficult.

However for the next set of posts we’ll be going through and fleshing out the environment with these (very) high level requirements

  • n+1 redundancy of the VDI deployment.
  • External Access
  • Load balanced (If possible)
  • Two different types of users. Dev and technical admins
  • Two different desktop OS’s available.
  • Profile to persist between sessions.
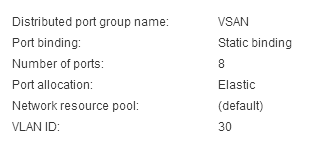
  • Security – no copy and paste, 2FA, logging, only applicable ports open between VLAN’s
  • Monitoring

This is more that enough to get us going back and asking many, many questions but for now we’ll pretend that most of them have been answered.

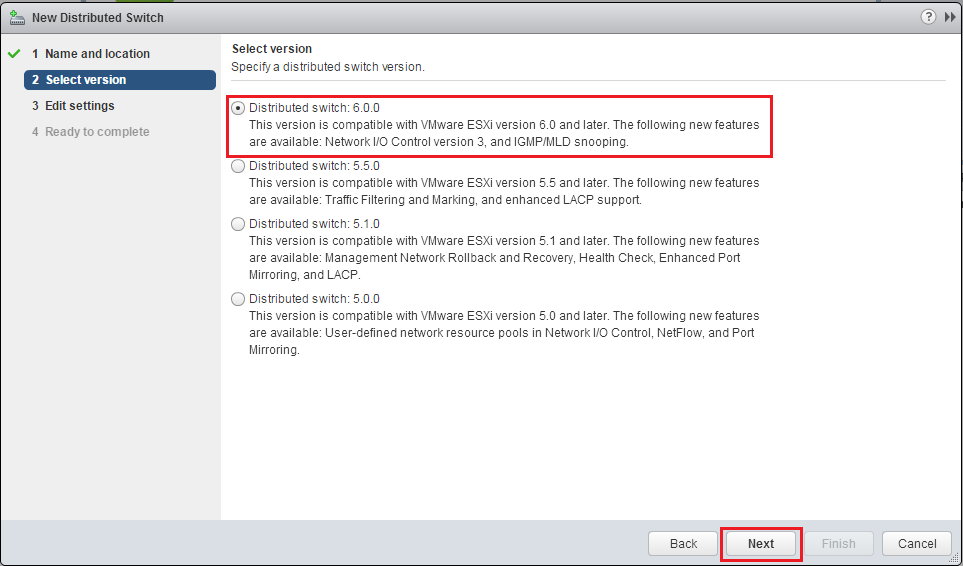
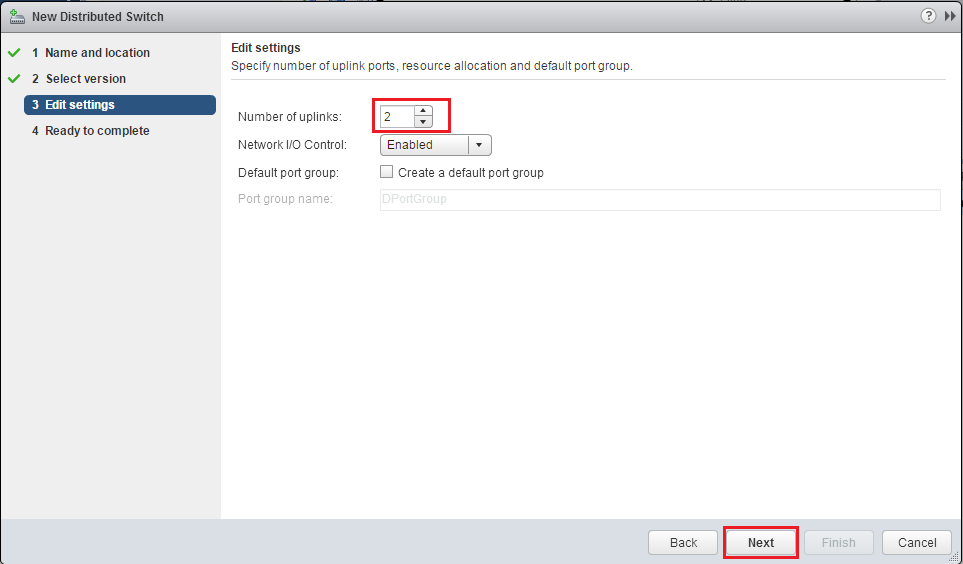
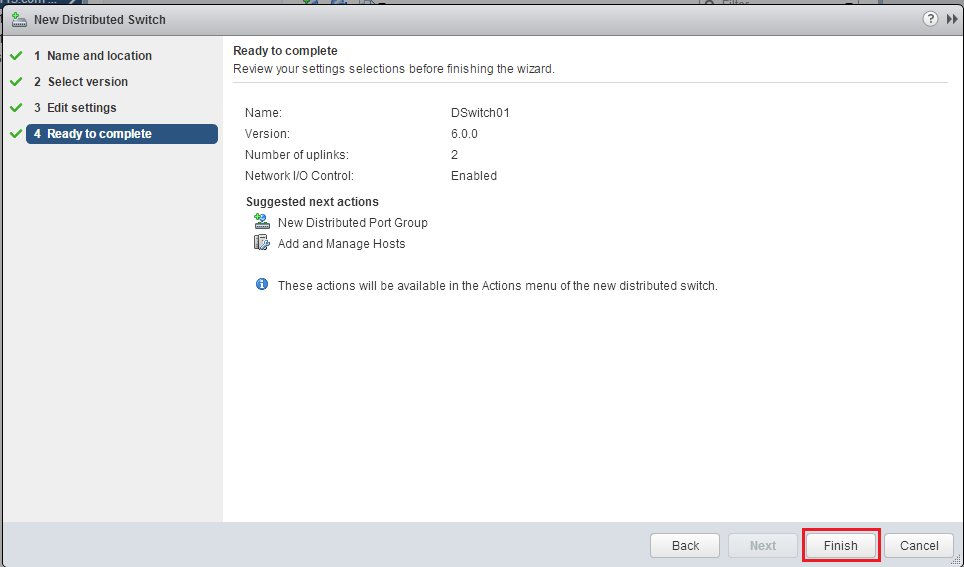
So that we don’t go off piste too much I’ll be mostly sticking to a stripped down version of VMware’s reference Architecture for the mobility suite that can be found here but slightly modified. The diagram below is partially from the linked page and modified to fit into my lab (hopefully). I’ll also make sure I reference any other blogs that i pull info from.

P.S. For the ESXi servers, I’ll be using William Lam’s most excellent ESXi servers that can be deployed via OVA onto either ESXi or Workstation/Fusion

Nested Home Lab – Part 12 – Distributed Virtual Switch

As we discussed in Part 2, for our basic lab, we wanted to separate out the networking  in to three parts:

Use Example IP Range
VM and Management 192.168.0.0
VSAN (vlan 30) 192.168.100.0
vMotion (vlan 40) 192.168.110.0

We have already set-up our physical host’s network in preparation to create our distributed switch.

So what we are looking to do here is create our distributed switch, create the port groups (tag them), and add our VMkernel interfaces. Easy Right?

Creating a Distributed Switch

  1. Log in using an account that has permission to configure the environment.Lic-1
  2. Select Home and Hosts and Clusters.AH-1
  3. Click on networking icon, right click on your Datacenter, Select Distributed Switch, Click New Distributed Switch.
    DS-2
  4. Enter in a name for your new switch. Click Next.DS-3
  5. Select Distributed Switch: 6.0.0.  Click Next.
    DS-4
  6. Set the number of uplinks to 2 and un-tick create a default port group. Select Next.DS-5
  7. Check that our setting are correct and select FinishDS-6

And thats the switch created.

Adding your port groups

We’re going to be creating two port groups, vMotion with a VLAN tag of 40, and VSAN with a VLAN tag of 30.

  1. Right click on the Distributed Switch. Select Distributed Port Group. Select New Distributed Group…
    DS-7
  2. Give the port group a name. In this case vMotion. Select Next.DS-8
  3. Set VLAN type to VLAN and the VLAN ID to 40. Leave all the other options as defaults.
    DS-9
  4. Double check the settings you specified are correct and click Next.DS-10
  5. Go back and create a Virtual SAN VLAN, but with a VLAN tag of 30.DS-11
  6. You should now have a vSwitch that looks like this:DS-12

For a basic lab, as we are creating, the networking is quite simple. However virtual networking has come a very long way and with the introduction of NSX it is now effecting the whole data centre. I would recommend you read Networking for VMware Administrators by Chris Wahl and Steven Pantol. While the book doesn’t cover NSX (understandable as its a whole discipline in itself) it is very good and I would highly recommend it. 

Home Labbing

Unless you’ve been living under a rock you will have heard two big announcements over the last couple of weeks.
1. vSphere 6 is official. 
2. VMUG advantage now comes with VMwares EVALexperience
While the vSphere 6 announcement was expected by the community the EVALexperience was a real surprise, to me anyway. 
What does this mean? Well, in addition to all the benefits that come with a VMUG advantage subscription you now get the ability to use a bunch of VMware’s software for the duration of your subscription. No rebuilds every couple of months which makes your home lab more “stable/persistent”and the list of available software looks quite good.
With each new release of vSphere or SRM or NSX or VSAN or … or … or … a lab becomes more important.

But what do you want out of a lab? Do you want to test new software, create disposable environments, run a permanent infrastructure? I guess its really up to and your budget. For me its important to test new software, do early investigation before I approach work and study. Do I need permanent running infrastructure? Not really. I prefer nested a ESX solution. It suits me and my budget. However there are many instances when you would want a “physical” lab, Consultants for a start.

Anyway, I have only three bits of kit that are really important to creating my home lab.

  • One second hand laptop (Main work horse).
  • One small netgear switch (TP-LINK TL-SG108E)
  • One Lenovo S20 (ESXi – Booted from USB)
Laptop –> Switch –> S20
Right, so the S20 I tricked out a bit. It has a full compliment of Ram (24GB), one 500GB SSD and one 1TB SSD. It’s connectivity to the world is through the 1GB interface and it boots from an 8 GB SSD.

The whole lab runs several Nested VM’s. Usually three ESX servers, VSAN, one VCSA and a DC. However it has run four ESX Servers, two windows servers with vCenter and SRM, and two Netapp simulators.

In the next post I’ll step through setting up a nested virtual lab.