Nested Home Lab – Part 5 – Adding an Active Directory identity source to your PSC / VCSA

Since the aim in these posts is to make a simple lab environment that you can use to test various scenarios, we’ll also want to have domain authentication set-up. However the lab will still run without domain authentication and you can use local user accounts. I personally prefer to enable domain authentication.

Remember, DNS is a very important part of Identity, so if you run into issues you might want to add that to your trouble shooting.

This part of the guide can be taken on its own but is based on a separate Platform Services Controller and vCenter Server Appliance.

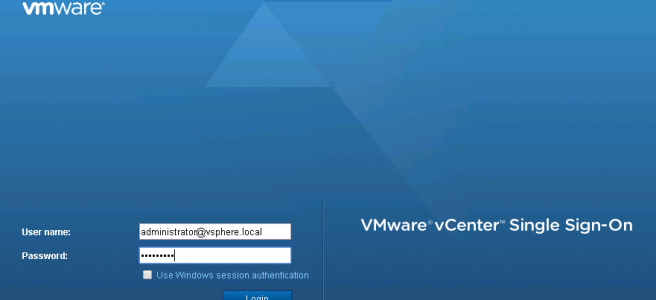
1.   Browse to the vSphere client, accepting any security errors (https://vcsa.domain:9443/vsphere-client), and login using administrator@your.vmwaredomain. In my case I left the SSO domain name as the default. administrator@vsphere.local. 


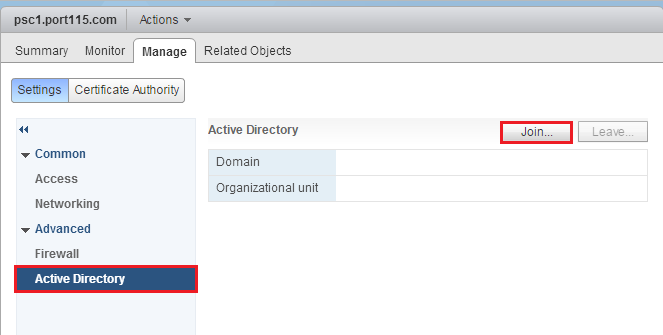
2.   Browse to Administrator, then System Configuration and select your PSC


3.   Select Active Directory and click Join.


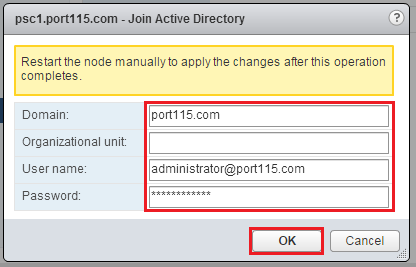
4.   Enter in the details for a Domain a user account that has permissions to join computer to the domain. Note: The user account format has to be @. Click OK when done.


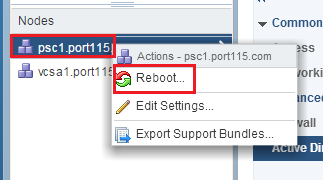
5.   Once this has completed (without any errors) reboot the PSC. Right click on the node and select Reboot.


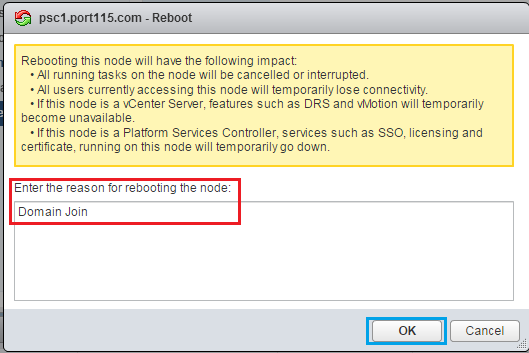
6.   Enter in a reason for rebooting the node if you want (I prefer to do this. Its a good habit to get into) and click OK. Rebooting the PSC will not mess up your VCSA session but will take about 5 mins or so.


7.   Once its back, refresh the page. You might need to browse back to the System Configuration page. You should now see the domain field populated and the join button will be greyed out.


8.   Click on Administration to take you back a page.


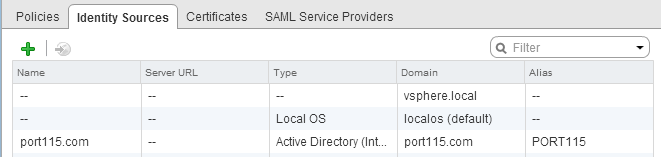
9.   Click on Configuration, select the Identity Sources tab and click the “+” sign to add a new identity source.


10. On this popup you will be offered four choices.
10.1  Select Active Directory (Integrated Windows Authentication Once you’ve selected that the Domain name field should automatically populate. If it didn’t then your PSC hasn’t joined the domain correctly.
10.2  Select Use Service Principle Name (SPN). STS/
10.3  Enter in the Service Principle name using the @. This account should have permission to browse your domain.
10.4  And the Password for the above account.
10.5  Click OK


11. If all goes well then you should see a new entry in you identity sources.


And that’s it you can now go and add your first domain user account to the permissions, which I’ll show you in the next post.

Nested Home Lab – Part 4 – VCSA

The VCSA 6 now offers feature parity with the windows edition, including the long awaited for linked mode. In fact when you look at the vSphere 6.0 configuration maximums doc it doesn’t have a separate section for the windows deployment and the appliance deployment.
Now in your environment you need to make a decision, Windows based or Appliance based. For me, personally, I’ve long been a fan of the appliance. Its easy to deploy and doesn’t require a windows license, not that I’m against windows at all.
For a small lab it’s quite a beefy install, even at the tiny deployment. 8GB Ram and 2 CPU’s and the HDD requirements can be anything from 30GB to 120GB depending on whether you are using the imbedded controller or not. http://kb.vmware.com/kb/2106572
But given all of that we will cheat a bit with the memory requirements. After deployment, drop it down to 4GB. Please not that this is not supported. 

As in the previous post, if you haven’t done so already, you need to install the Client integration plugin which can be found in the iso at vcsaVMware-ClientIntegrationPlugin-6.0.0.exe.


Firstly unpack the ISO to your local drive. C:/temp for example.

1. Double click on vcsa-setup.html. (found in the unpacked ISO).

2. Your browser might ask for confirmation before staring the Client integration plugin. Accept the caution.

3. Select Install

4. Select “I accept the terms of the License Agreement”Click Next.

 5. Enter in the IP address, username (usually root) and the password of the ESXi server you are deploying the PSC to.Click Next.

 6. Accept the certificate warning by clicking Yes.

 7. Enter in the name of the VCSA and give it a password. Click Next.

 8. On this screen you have three choices. For our lab we’ll select “Install vCenter Server (Requires external Platform Services Controller)“. Click Next.

9. Now here we’ll want to enter in the details of the PSC we deployed previously, entering in the PSC name and the SSO password. Its usually best to leave the SSO port at 443. Click Next.

10. Leave the appliance size at tiny. Click Next.

11. Select the datastore you want to deploy into and select “Enable Thin Disk Mode“. Click Next.

12. Select “Use an embedded database (vPostgres). Click Next.

13. Carefully, enter in the networking details, tick “Enable ssh”. Click Next.

 14. Check all your config details. Click Finish

If all your network settings were correct, the install will go off and work its magic. 
Next post: we’ll go through joining the whole lot to your domain.

Nested Home Lab – Part 3 – PSC

So back again.

In this post we’ll look at installing the Platform Services Controller (PSC).

Forgetting about ESX for a minute, this new iteration of vSphere is, in my opinion, a huge leap forward for administrators. It feels like the virtual appliance architecture has finally come of age. The split of duties makes a great deal of sense. The PSC is responsible for Single Sign On (SSO), Licensing, and as a Certificate Authority, while the VCSA hosts the inventory service, the web client and others.

So why on different appliances for this lab? Well going forward, in future blog posts, we’ll look at connecting a second VCSA to the PSC.

This first VCSA and PSC will lay the foundation for this and future labs

OK onward.

To install the VCSA and/or PSC you you will need to install the VMware client intergration plugin. can be found in the iso at vcsaVMware-ClientIntegrationPlugin-6.0.0.exe. To be honest I’m still not 100% sure why this is needed. I’ve seed similar functionality using HTML5.

This part of the installer does assume that you have a DC up and running. If you don’t you should get one setup before continuing as we will need it later, if you choose to follow that part of the guide.

Once that’s done we can fire up the installer and get the PSC installed.

Firstly unpack the ISO to your local drive. C:/temp for example.


1. Double click on vcsa-setup.html. (found in the unpacked ISO).


2. Your browser might ask for confirmation before staring the Client integration plugin. Accept the caution.
3. Select Install
4. Select “I accept the terms of the License Agreement”Click Next.
5. Enter in the IP address, username (usually root) and the password of the ESXi server you are deploying the PSC to.Click Next.
6. Enter in the name of the PSC and give it a password. Click Next.
7. On this screen you have three choices. For our lab we’ll select “Install Platform Services Controller”. Click Next.
8. Select Create a new SSO Domain. Select a password for the SSO domain. This is different from the appliance root password, which is for the OS. If you don’t write down your lab passwords ,choose something easy to remember, We’ll need this password later. Enter in the SSO Domain name as vsphere.local and the site name as -site-1. Click Next.
9. Appliance size… Well nothing to choose here… Click Next. 
10. Select the datastore you want to deploy the PSC onto. The SATA drive should be fine for this as it’s a relatively small appliance. 

11. Networking is King here and you’ll need to be vigilant going through this. For the time sync select “Synchronize appliance with ESXi host” and tick “Enable ssh”.  Click Next.

12. Check and check and check your settings. Once you are happy, Click Finish.
13. The installer will now go off and setup the PSC on your ESXi server.
That’s the first bit done. Next post is the VCSA installation. 
EDIT: This is quite a good read for those who would like move info on the PSC: VMware Platform Services Controller 6.0 FAQs


Nested Home Lab – Part 2 – Networking

Networking


While we can run all our services over one network segment, for this lab we really want three VLANs.
Networking setup will differ slightly for ESXi and Workstation but both will use the three VLANs.
Use Example IP Range Note
VM and Management 192.168.0.0 Best to use you existing home network.
VSAN (vlan 30) 192.168.100.0 Internal Only
vMotion (vlan 40) 192.168.110.0 Internal Only

It is considered best practice to separate out various types of network traffic. Usually you would separate out your VM traffic from your management but for this lab we will keep them together. We will separate out vMotion and VSAN traffic though.

ESXi: When I’m designing a vSphere environment with rack mount servers in mind I usually separate management traffic out into a separate standard virtual switch (2 x 1g ports) and all other traffic is sent to 2 x 10g ports through a distributed virtual switch using vlans to separate the traffic further and NIOC to control bandwidth.

All righty then, what’s this going to look like for us?

In Workstation:

 
In ESXi:

So far, so good. For Workstation nothing else needs to be done.

As you can see from the ESXi image above I haven’t specified a physical adapter for vSwitch1, With ESXi if network traffic is on the same VLAN and on the same virtual switch, it won’t go the the physical switch. The virtual switch, an in memory construct, will just pass the traffic along, however if you need to cross VLANs, the traffic will need to be passed to the physical switch for routing across VLANs. In this case, its very handy as we won’t want traffic to pass between the VSAN port group and the vMotion port group. EDIT: What we want to do is set-up the LAN port group with VLAN 4095. This will enable ESXi to pass the vlan traffic about correctly.

Now is ESXi we need to make two changes to the vMotion and VSAN port groups, Enable Promiscuous Mode and Forget Transmits:

William Lam of Virtually Ghetto has a great write up here discussing the reasons for this.

So those are the networking eccentricities, Next we’ll look at getting our first VCSA with a dedicated Platform Services Controller up and running.

Just a note: I had hoped to post this sooner but family and holiday commitments took over.