Nested Home Lab – Part 12 – Distributed Virtual Switch

As we discussed in Part 2, for our basic lab, we wanted to separate out the networking  in to three parts:

Use Example IP Range
VM and Management 192.168.0.0
VSAN (vlan 30) 192.168.100.0
vMotion (vlan 40) 192.168.110.0

We have already set-up our physical host’s network in preparation to create our distributed switch.

So what we are looking to do here is create our distributed switch, create the port groups (tag them), and add our VMkernel interfaces. Easy Right?

Creating a Distributed Switch

  1. Log in using an account that has permission to configure the environment.Lic-1
  2. Select Home and Hosts and Clusters.AH-1
  3. Click on networking icon, right click on your Datacenter, Select Distributed Switch, Click New Distributed Switch.
    DS-2
  4. Enter in a name for your new switch. Click Next.DS-3
  5. Select Distributed Switch: 6.0.0.  Click Next.
    DS-4
  6. Set the number of uplinks to 2 and un-tick create a default port group. Select Next.DS-5
  7. Check that our setting are correct and select FinishDS-6

And thats the switch created.

Adding your port groups

We’re going to be creating two port groups, vMotion with a VLAN tag of 40, and VSAN with a VLAN tag of 30.

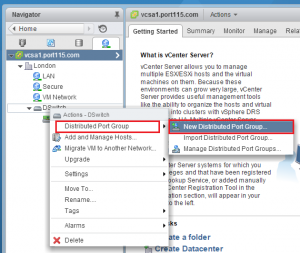
  1. Right click on the Distributed Switch. Select Distributed Port Group. Select New Distributed Group…
    DS-7
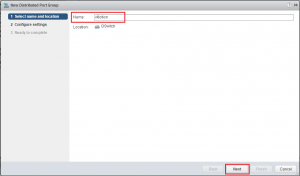
  2. Give the port group a name. In this case vMotion. Select Next.DS-8
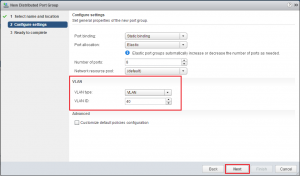
  3. Set VLAN type to VLAN and the VLAN ID to 40. Leave all the other options as defaults.
    DS-9
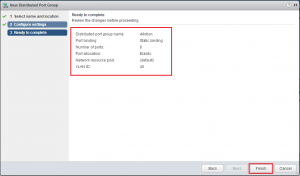
  4. Double check the settings you specified are correct and click Next.DS-10
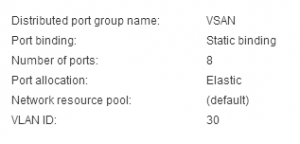
  5. Go back and create a Virtual SAN VLAN, but with a VLAN tag of 30.DS-11
  6. You should now have a vSwitch that looks like this:DS-12

For a basic lab, as we are creating, the networking is quite simple. However virtual networking has come a very long way and with the introduction of NSX it is now effecting the whole data centre. I would recommend you read Networking for VMware Administrators by Chris Wahl and Steven Pantol. While the book doesn’t cover NSX (understandable as its a whole discipline in itself) it is very good and I would highly recommend it. 

Nested Home Lab – Part 11 – Clusters and hosts

Short post today.
In this post we will create a new cluster. Once that’s done you can add the hosts using the steps outlined in Part 7.

1. Log in using an account that has permission to configure the environment.

2. Select Home and Hosts and Clusters.

3. Right click the datacenter we created in Part 7 and select New Cluster.

4. Give the cluster a name. In this case I have user Site1. Leave the other settings off or on Default and click OK.

5. You should now have a new Cluster called Site1.

You can now follow the same steps from Part 7 that we used to add our primary host.

Nexenta – File Services for VSAN

Where I work we are heavily invested in NetApp and 3PAR. Software vendors that also make the hardware for their software to run on. For a large organisation its attractive, one number to dial when SHTF. However with the rise of software defined everything, we are seeing a shift away from that. VMware, clearly one of the market leaders in the software defined space brought out VSAN, and I really, really, like it. Its evolving very fast to meet customer requirements. Support for all flash, stretched clustering, and ROBO set-ups (which I’m really interested in) to name a few. However missing in this mix of awesomeness is file sharing. If Software defined storage is really to take on the big players it needs to really offer more than a place to put virtual disks. Sure you can run a file server VM but that adds an extra layer of complexity. Where’s the integration?

nexenta_logoIn comes Nexenta with NexentaConnect for VMware Virtual SAN.  Now Nexenta has been on the edges of my radar for a while. I knew they were heavily focused on storage, software defined storage to be exact, but I’d never really looked any deeper. My big focus for the last year has been to push VSAN into the company I work for. I could see the cost savings, the ease of use. In the end, after a successful POC, it was a combination of the two that sold it. During the next two to three years it could save the company a huge amount of money.

Back to Nexenta: NexentaConnect has me very interested. Time to get it in the home Lab.

So having worked with it over the weekend, I have made the following (preliminary) observations:

  1. It does what is says on the tin.
  2. Its very strict with its requirements (I tried to cheat and it failed).
  3. Installing the plugin is a manual task, which some Admins might not like.
  4. The whole process of deploying the first OVA’s to having my first shared volume took just less than an hour.

Once you need the minimum requirements, its quite easy to get going with NexentaConnect and its also easy to pull out if you no longer require it.

There are three main components: The vCenter plugin, the connect manager, and the IO engine. The vCenter plugin is very well integrated and fronts the connect manager, which in turn controls the IO engine. The IO engine is a Virtual Storage Appliance (VSA) that gets deployed into your VSAN cluster..

When you create you first share, whether it be NFS or SMB, an IO engine is deployed to the VSAN datastore. I found deployment of the IO engine to be very fast in my LAB. You can also apply different pre-created VSAN storage policies to each share. Once the IO engine was deployed adding additional share was even faster.

As I don’t currently have a full physical lab, I couldn’t in good conscience do any real performance testing, but it was very quick even in a nested virtual environment.

This product will really shine in smaller shops, which are often overlooked, or ROBO offices. VSAN coupled with a product like this could help a smaller business through the awkward period of transitioning from a small to medium business and at that stage why take it out? That’s not to say that larger organisations shouldn’t take a look and implement if it fits their strategy.

The product as a whole is very interesting and I really do like it. There have been several write ups and youtube videos from several big bloggers detailing various bits of the set-up. Cormac Hogan did a great write-up here and so has Rawlinson Rivera of Punching Clouds.

Its great to see real innovation like this coming from the industry and I highly recommend heading over to Nexenta’s website and take a look.