Horizon View – How to install the Linux Desktop agent.

In the previous post we looked at joining the Linux desktop to an Active Directory domain. While its not necessary for Linux desktop to be domain members I feel it should be done if a domain is available.

As before we’ll be focusing on two business ready distro’s; Centos 7.X (RHEL) and Ubuntu 18.04 (LTS). We’ll get the correct dependencies setup, and the agents installed.

To begin I have deployed CentOS 7, with a GUI (Gnome) and Ubuntu 18.04 LTS. VM’s. Both VM’s are fully patched and running the latest available official kernels as of 16/11/18. A local user has been created during install time called viewuser01. The VM’s are called centosdt-01 and ubuntudt-01 respectively. Static IP’s have been assigned. Ubuntu is running the GNOME desktop and CentOS is running KDE.

In addition I would recommend you go and take a look at this page System Requirements For Horizon 7 for Linux.

[EDIT 26/01/19]: Depending how your VM is installed you might get an error when trying to install the agent stating that the hostname is resolvable.  This is common if you are setting up a template to be referenced by an automated desktop pool and the hostname of the desktop pool isn’t in DNS. The fix is to add the hostname to the /etc/hosts file next to the entry 127.0.0.1.

Ubuntu:

Only certain desktop environments are supported in Ubuntu and unity is not one of them. VMware have written a kb detailing how to change the desktop in Ubuntu:  KB2151294.  Since I’m using 18.04 LTS its not an issue as the default desktop is Gnome.

  1. Open a terminal and run the following to update and install dependencies. Note that you’ll be asked to choose a display manager, choose lightdm:
  2.  sudo apt-get update
    sudo apt-get -y upgrade
    sudo apt-get -y install open-vm-tools python python-dbus python-gobject lightdm 
  3. Reboot (might not be strictly necessary but if there is a kernel update its a good idea)
  4. Download or copy across the VMware Linux agent. (Currently VMware-horizonagent-linux-x86_64-7.6.0-9857537.tar.gz)
  5. Open a terminal and locate the downloaded agent. Usually in /home/<user>/Downloads/
  6. Unpack the file.
  7.  tar zxvf VMware-horizonagent-linux-x86_64-7.6.0-9857537.tar.gz 
  8. Change into the unpacked directory
  9.  cd VMware-horizonagent-linux-x86_64-7.6.0-9857537 
  10. Run the installer, type y to accept the EULA
  11.  sudo sh ./install_viewagent.sh 
  12. Reboot your VM
  13.  sudo reboot 

Ubuntu is configured and ready to go.

CentOS:

It’s usually easier to get dependancies resolved in CentOS and CentOS is “aware” its running as a VM and will usually have the open VMtools installed.

  1. Open a terminal, switch to root and run the following to update and install dependencies, and fix the networking.
     yum -y update&amp;amp;amp;amp;lt;/li&amp;amp;amp;amp;gt;&amp;amp;amp;amp;lt;li&amp;amp;amp;amp;gt;&amp;amp;amp;amp;lt;pre&amp;amp;amp;amp;gt;yum -y install glibc
    virsh net-destroy default
    virsh net-undefine default
    service libvirtd restart
    
  2. Reboot (might not be strictly necessary but if there is a kernel update its a good idea),
  3. Download or copy across the VMware Linux agent. (Currently VMware-horizonagent-linux-x86_64-7.6.0-9857537.tar.gz)
  4. Open a terminal and locate the downloaded agent. Usually in /home/<user>/Downloads/.
  5. Unpack the file.
     tar zxvf VMware-horizonagent-linux-x86_64-7.6.0-9857537.tar.gz 
  6. Change into the unpacked directory
     cd VMware-horizonagent-linux-x86_64-7.6.0-9857537 
  7. Run the installer, type y to accept the EULA
     sh ./install_viewagent.sh 
  8. Add a Firewall rule so that the agent can talk to the Connection server
     firewall-cmd --add-port=4001/tcp --permanent
  9. Reboot your VM
  10. reboot 

CentOS is configured and ready to go.
VCP-DTM 2018 Exam and My Studies 2V0-51.18

One of the reasons I’ve been a bit lax posing new content is that I’ve busy spending my free time (what little of it there is) studying for the VCP-DTM exam, the 2V0-51.18 to be exact. VCP-DTM is the certification. I’ve been involved in a View deployment at work and  since I’ve been working with the tech a fair bit over the last few months I though “why not?”.

There are three exams currently offered for Horizon View:

  • 2VO 51.18 – VCP-DTM 2018
  • 2V0-751 – VCP7-DTM
  • 2V0-651 – VCP6-DTM

The 2VO 51.18 is the latest and fits into VMware’s new Certification naming. There is a bit of a write up about it here.

The main notable difference between the 751 and 51.18 exams is that the requirement for Mirage is missing from the latter and the exam preparation guide clearly states that it is focused on Horizon View 7.5 and related products. So get the preparation guide and use that as your base to get going.

Studying – The Lab:

So first and foremost was my trusty lab. I am fortunate enough to have a fairly beefy workstation with 64GB RAM, running ESXi. This allowed me to run quite a few infrastructure VM’s and 4 or 5 desktops. While a machine of this spec isn’t strictly necessary, you will need a lab of some kind.

When you start looking at whats needed it can look like a lot of infra is needed but it doesn’t all need to be running at the same time. You can get away with only one running desktop as you test the different deployment types. The Composer server is more than happy to run on the same VM as the SQL Express install and once the VCSA is deployed you can shave off some of the RAM. vROPS, Identity Manager, App Volumes and User Manager don’t need to be up and running all the time or even together. If this is internal, turn off the UAG as soon as you’re done with it.

Much of this can be run in VMware workstation but you will need an ESXi server at some stage to deploy desktops onto.
Study – The Hands on Labs.
This resource from VMware is amazing. Its also free. Some of the Horizon Requirements I wasn’t familiar with at all, so this helped. I went in and did a search for Horizon 7.1 and did them inline with the Official Study guide. “HOL-1951-01-VWS – VMware Workspace ONE – Getting Started” isn’t strictly needed (but still worth doing) but I would strongly recommend the first two modules of “HOL-1951-03-VWS – VMware Workspace ONE – Advanced Topics” as it covers “Identity Manager”.

Studying – The Videos:

The most popular videos are the ones Greg Shields has created on Plural sight called VMware Horizon 7 Desktop and Mobility (VCP7-DTM). These are well presented and you can follow along in your Lab and have been collected into a learning path.

There are also a bunch on the official VMware YouTube channel which are worth watching.

While attending a class is a great experience, I do often prefer video study. I can work at my own pace, jump back and forwards as it suits me.

Studying – Reading Material:

To be honest I didn’t find any really up-to-date books on 7.5, which was a bit disappointing.

It was mostly going through the official material and blogs. The release notes and Architecture Planning Docs I found good, and I bounced quite a lot from these into the other official documentation

This blog post on the network ports is quite interesting too.

A very notable blog (much better than is one) is by Carl Stalhood over at www.carlstalhood.com. Its really well formatted and kept current.

The Exam Experience:

The exam itself is 59 questions over 105 minutes. Its not easy, I give it that.

I arrived just in time and after the usual round of stuffing my stuff into lockers, form signing, photos, and checking of pockets, was rushed through into the exam room. 59 questions later (several of those flagged) and I got the popup stating that I’d passed. I don’t particularly enjoy sitting for tests but I really enjoy that moment.

Exam tips:

Arrive about 15 minutes early and bring photo ID. First and foremost, nobody is out to trick you, but you are being tested to a high standard. Always make sure you read the questions carefully and in full. The questions are usually always clear and concise, and even if you don’t know the answer you can sometimes work out what what answer is not. It’s easy to get rattled during any kind of test, if you are not sure of your answer mark it for review and come back to it once you’ve gotten to the end.

If you decide to go for this exam, good luck!

Horizon View Connection Server – Install and basic setup 2/2.

Got the install done and now on to the setup. We’re going to look at doing 4 bits of config and 1 check:

  1. Check the certificate is recognised.
  2. Licensing your install
  3. Connecting to a vSphere server.
  4. Configuring the events Database
  5. Adding a syslog server.

Before you begin any of the below login to your Connection server https://<full_server_name>/


Licensing your install

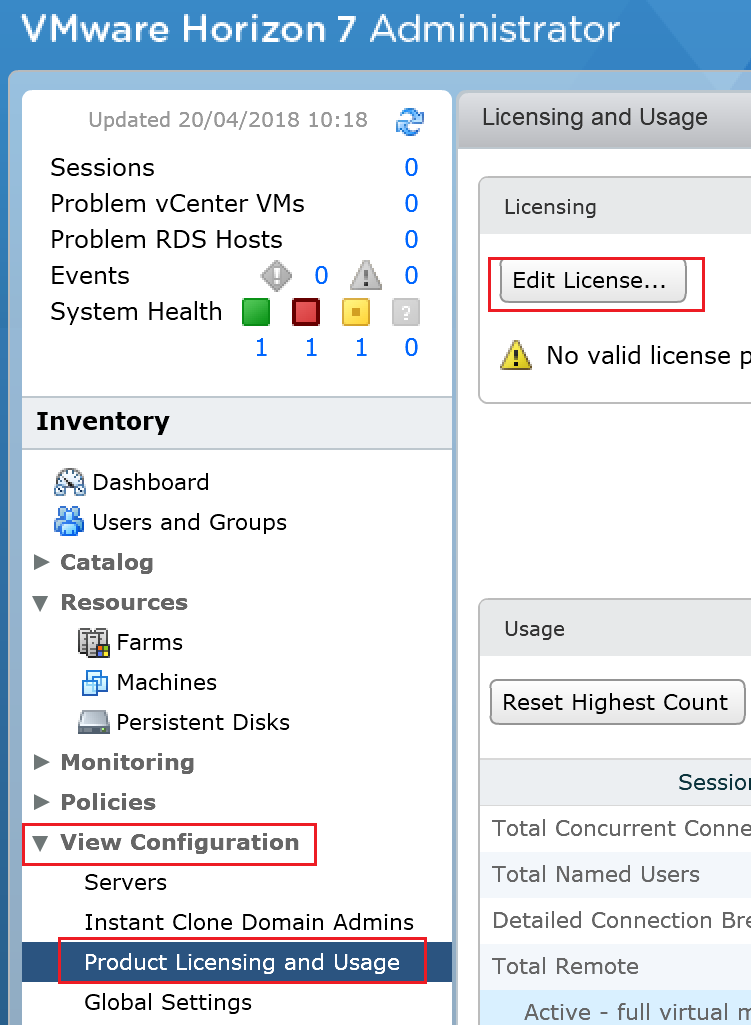
  1. On the right hand panel labelled Inventory.
    1. Expand View Configuration.
    2. Select Product Licensing and Usage
    3. Click Edit License…
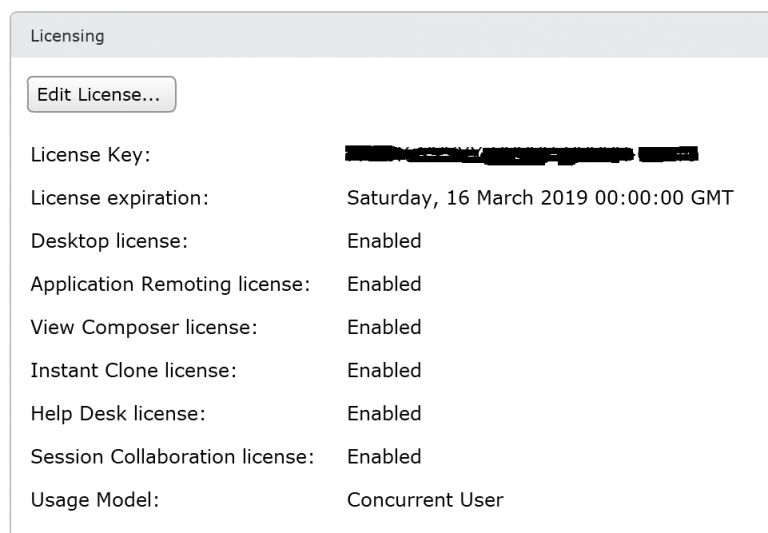
  2. Enter in your serial number and click OK.
  3. Your license info should now be shown.

Configuring the events DB

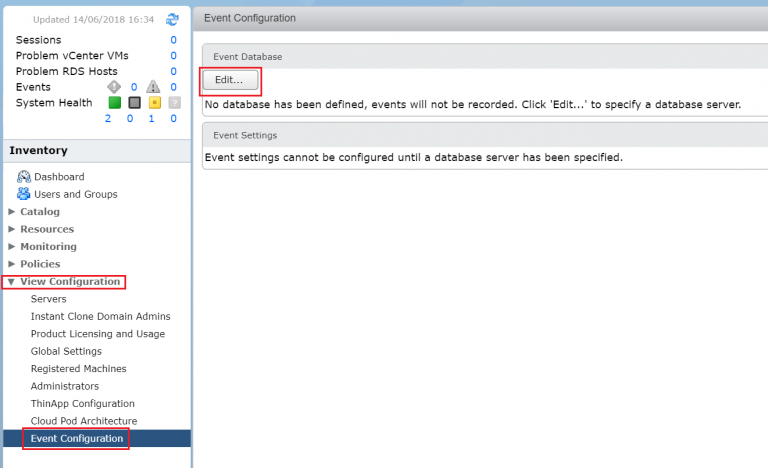
  1. On the right hand panel labelled Inventory.
    1. Expand View Configuration.
    2. Select Event Configuration
    3. Click Edit…
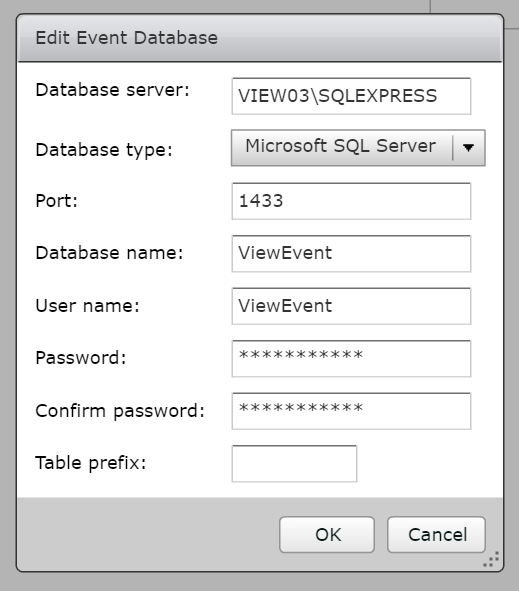
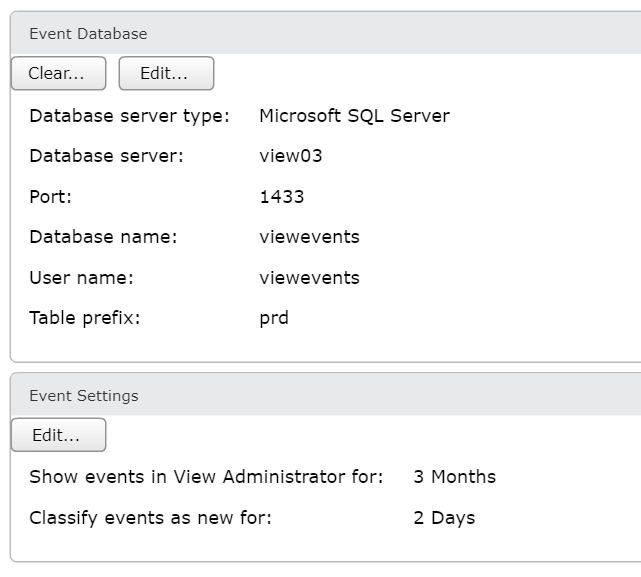
  2. To see how to create the events database here is a previous post where we looked at creating the events database using SQL Express. Fill in the details that you used to create the database.
  3. If the connection is successful you’ll see the following:


Connecting to the vCentre Server Server

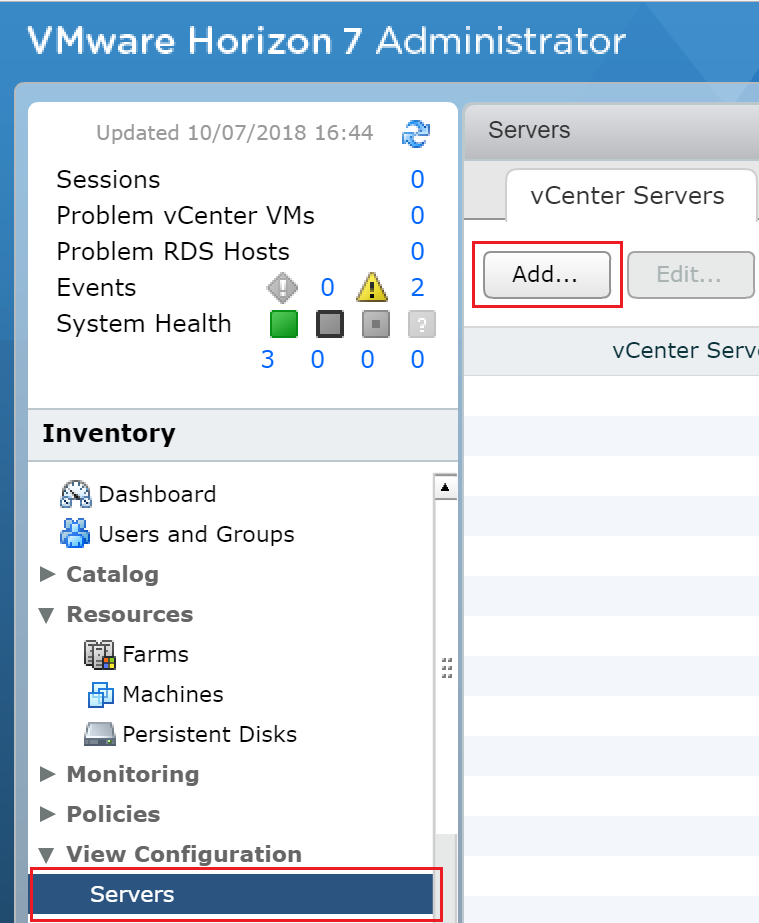
  1. On the right hand panel labelled Inventory.
    1. Expand View Configuration.
    2. Select Servers.
    3. Click Add…
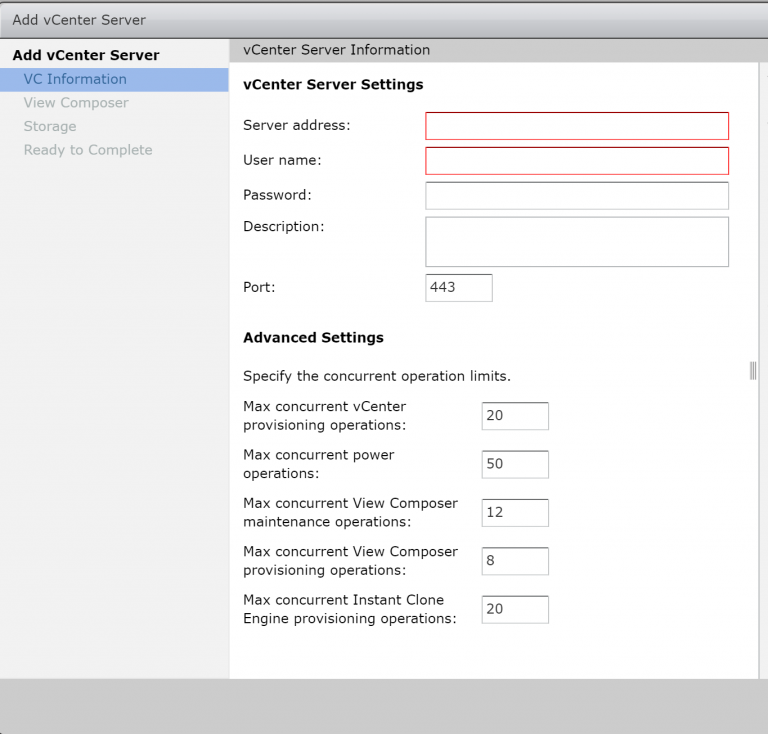
  2. Enter in the details of the VCSA and a user that has the correct privileges. For most medium sized deployments the default Advenced Settings will be fine. Generally speaking you need to determine how much connection traffic your environment will receive and how the storage will cope.
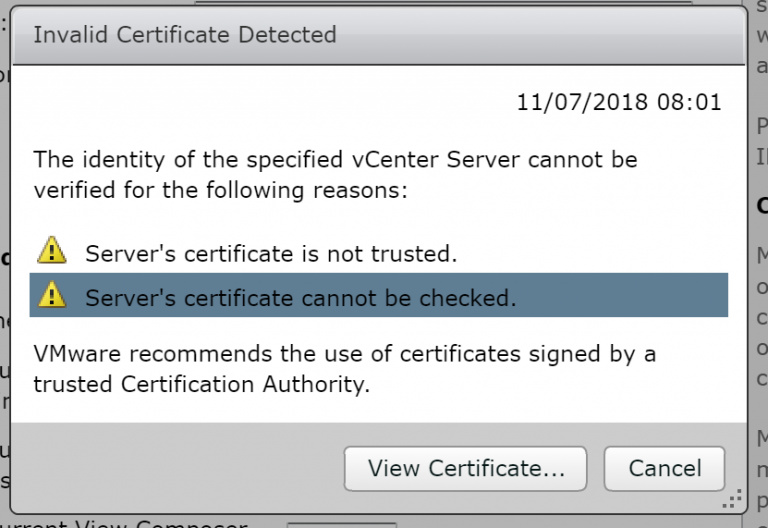
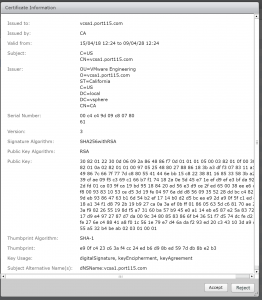
  3. This warning will pop up if you are using the default certificates generated by the VCSA. Click View Certificate…
  4. Click Accept…
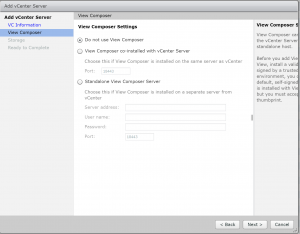
  5. Select Do not use View Composer (we’ll do this later) and click Next.
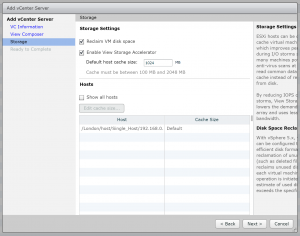
  6. Select Reclaim VM disk space and Enable View Storage Accelerator and click Next. Changing the Default host cache size can help with storage acceleration but will take the memory away from the host that it dedicates to VM’s and use it for storage caching.
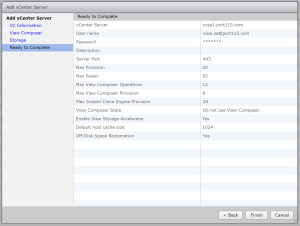
  7. A final check your selected options, if all looks good click finish.
  8. If the connection is established successfully then you see the VCSA added to the vCenter Servers tab.

So now we’re configured and ready to go, except for the vRealise and Log Insight server which well add as we build them out. The next post will look at installing the bits needed for connecting to a Windows Desktop as well as putting together the first pool.

Horizon View Connection Server – Install and basic setup 1/2.

Apologies to the three people who read this blog regularly,  The last month has been very busy.

So far we have configured a Root CA, and imported a certificate into what will become our first connection server, and a setup a SQL database. Now we are ready to install and do a basic setup our first connection server.

Installing the Horizon View Connection server.

  1. Connect to the server you will be using as your connection server.
  2. Copy across the installer and double click to run.
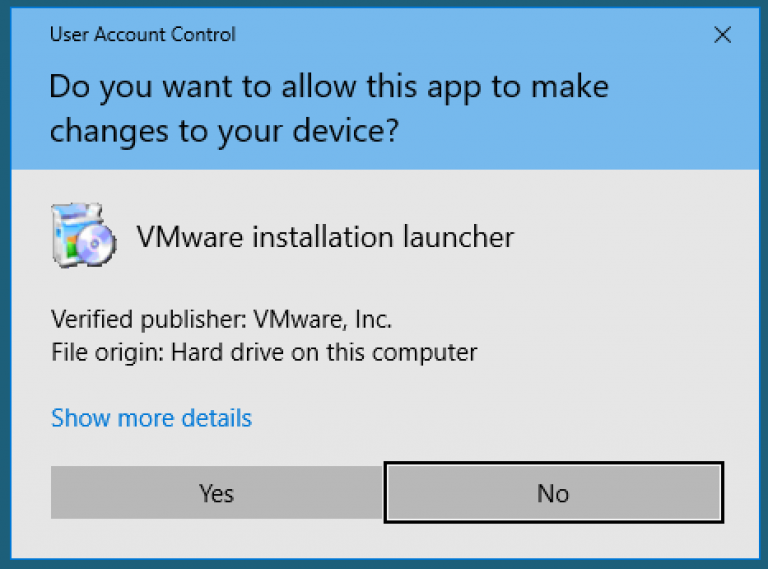
  3. Click Yes. To accept the UAC warning.
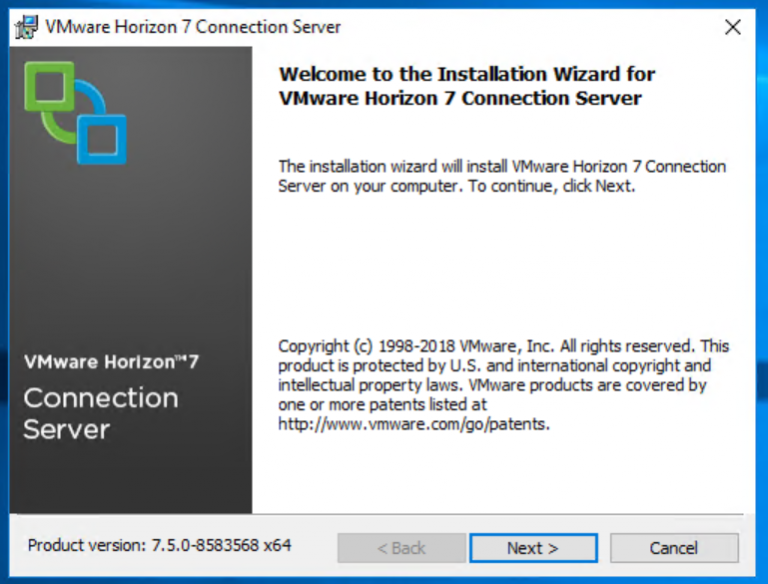
  4. Click Next.
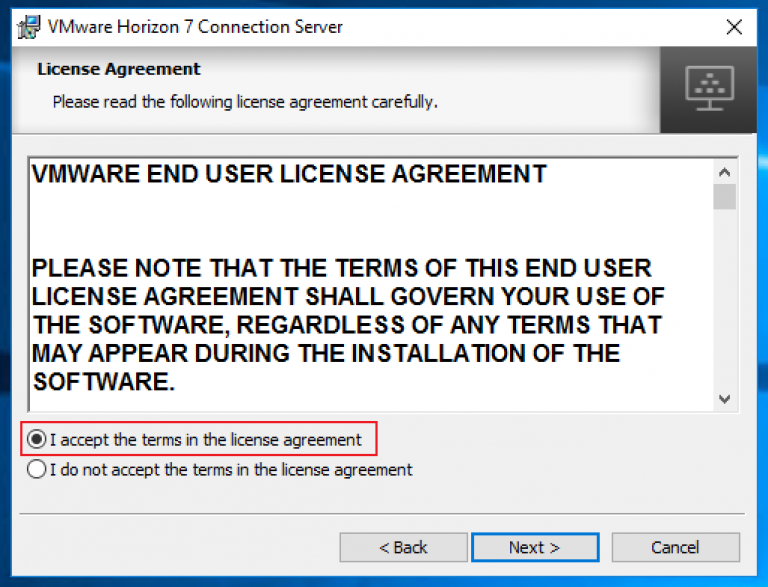
  5. Select “I accept the terms in the license agreement” and click Next.
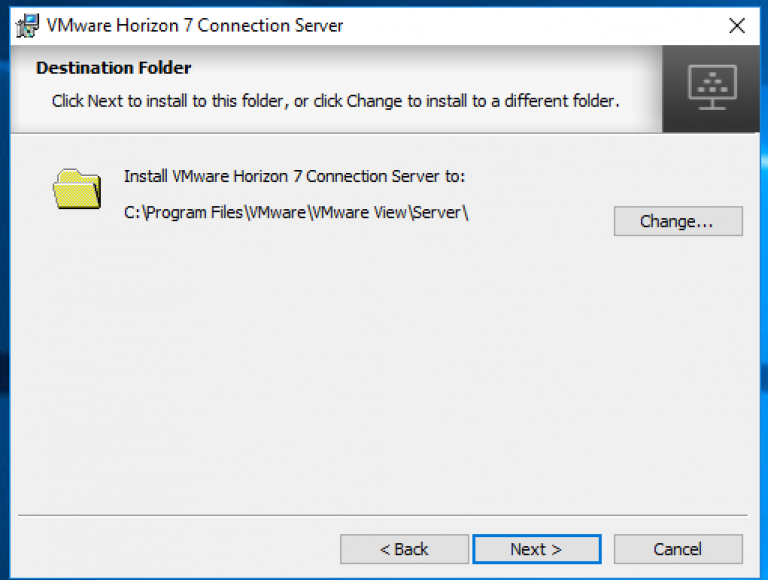
  6. Here you can change the installation location if you prefer. Click Next.
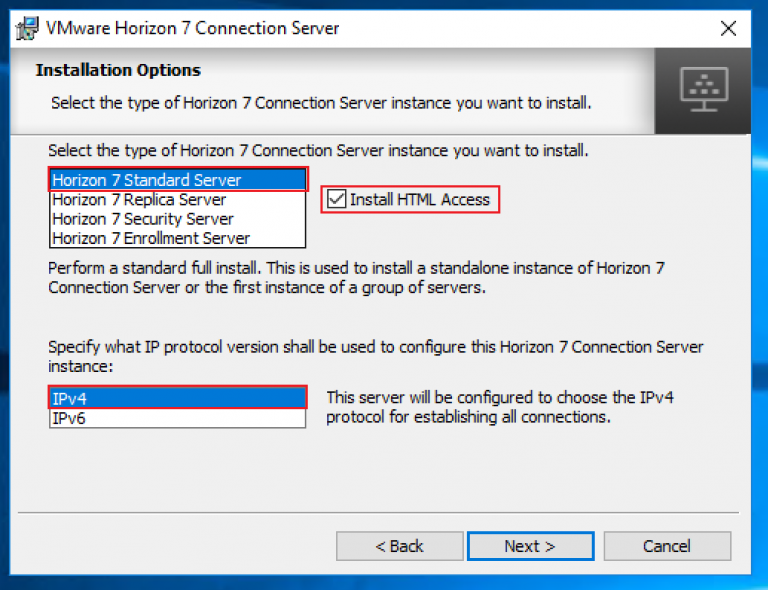
  7. On the Installation Options window:
    1. Select Horizon 7 Standard Server as the install.
    2. Select  “Install HTML Access”, this is technically not necessary but I would recommend it.
    3. Select the IP protocol you use. IPv4 would be the most common I expect
    4. Click Next.
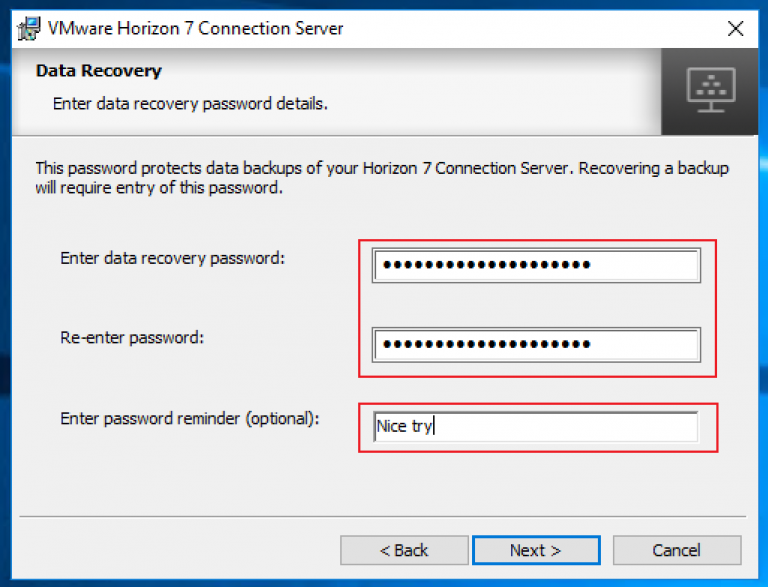
  8. Enter in a password for Data Recovery and a hint if you prefer. Click Next.
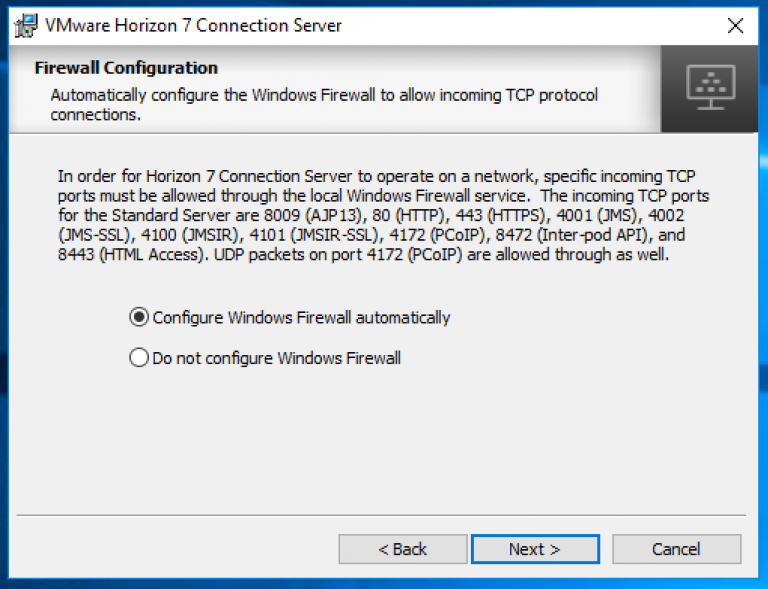
  9. Select whichever is appropriate for your environment, bearing in mind that most companies will have the servers firewall controlled via GPO. So check with your Windows and Security guys. In this case I want the firewall of this server to be configured automatically. Click Next.
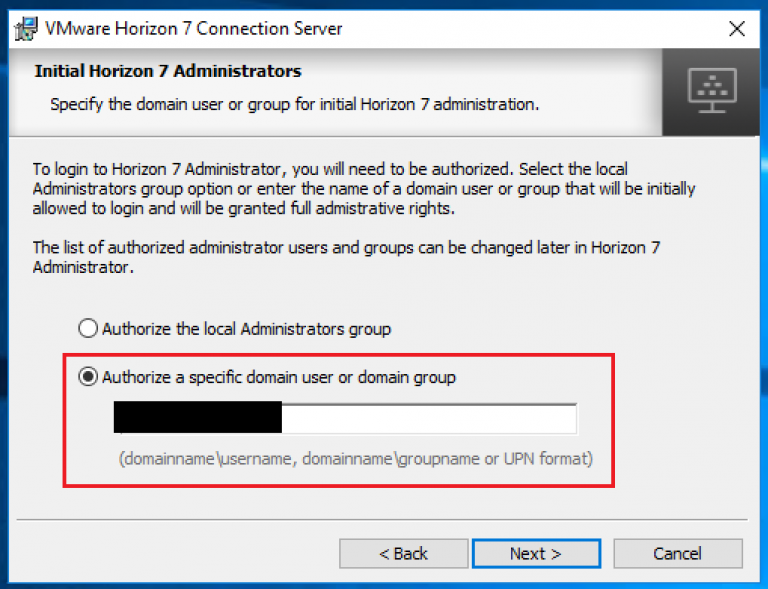
  10. Select whether you’d like the local Administrators Group to have Admin rights to view. This can be changed later but I generally prefer not to from the start. Click Next
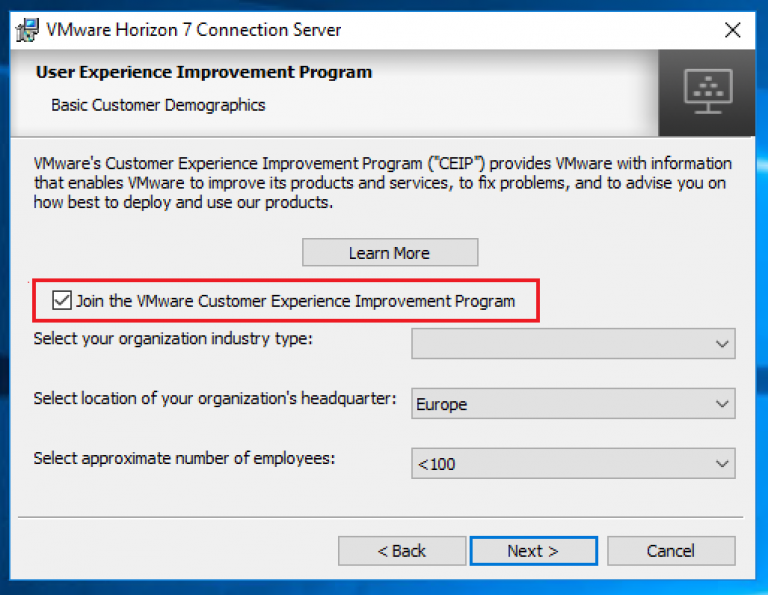
  11. Choose whether you want to join the VMware Customer Experience Program or not. If your company policy allows it I would recommend you do. Click Next.
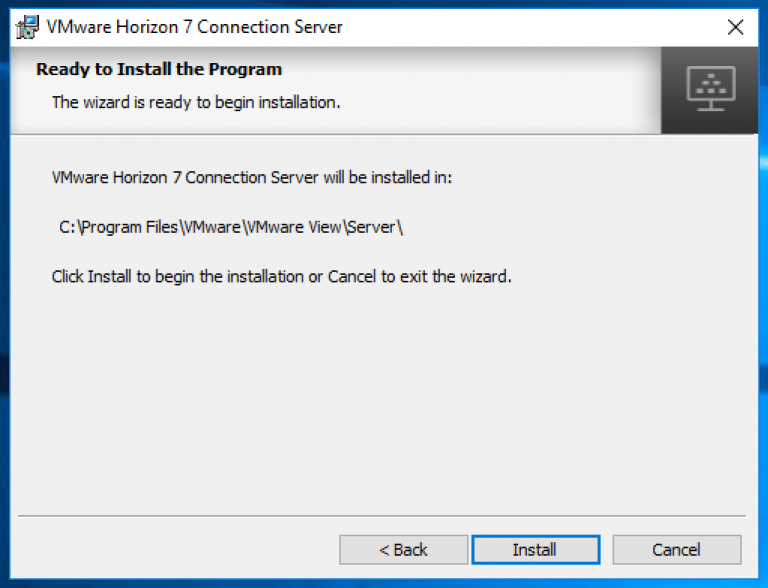
  12. Click Install.
  13. Once the installer is done, click Finish.

Now we have the Horizon View Connection Server installed which can be verified by going to http://<your_full_server_address>/admin.

In part 2 we’ll get the basic config done. Adding a vCenter server, connecting to the events DB and licensing your install.


Preparing for Horizon View – Connection Server Certificate.

Doing a straight forward install of the connection server is fairly easy. its mostly next-next-next. However since we are trying to do this deployment as close to prod as possible we want to get a certificate installed from the root CA we setup in an earlier post.

Post deployment task- Certificate install.

The instructions below are to be run on server you’re intending to install the Horizon view connection server on.

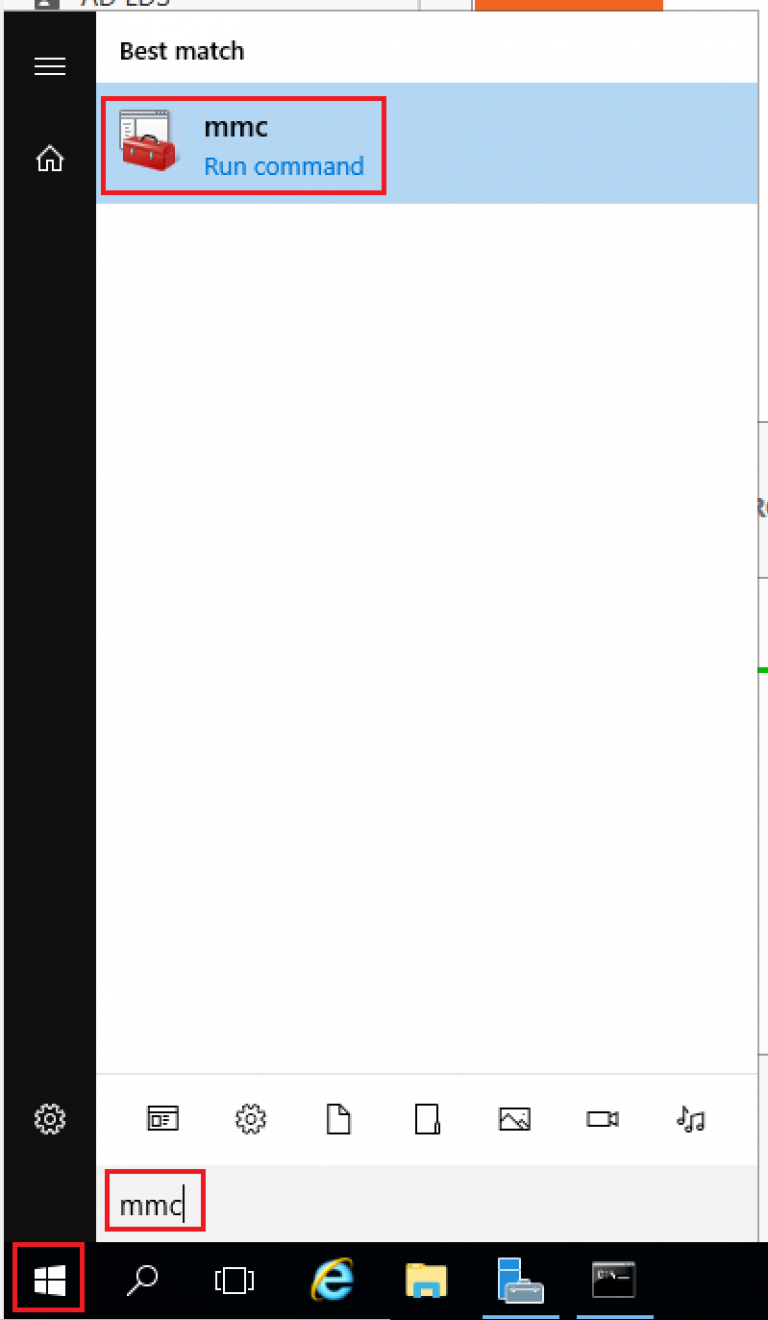
  1. Click on the windows icon, type mmc and select it to start the mmc.
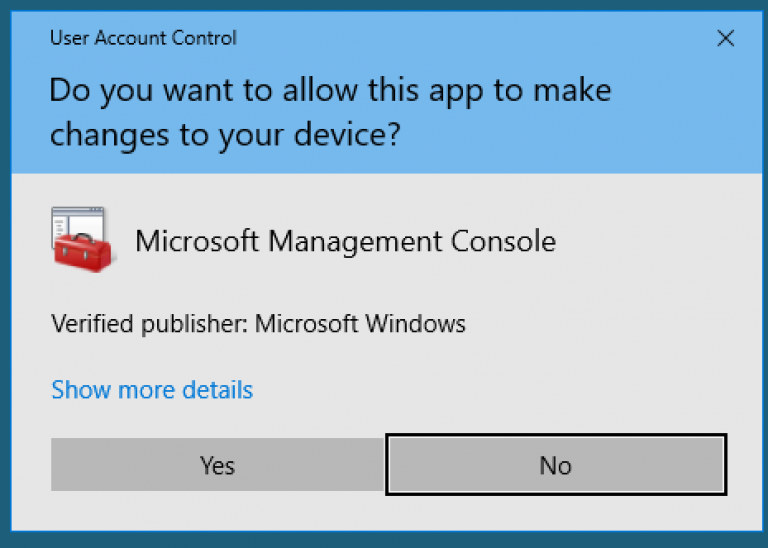
  2. Accept the security warning.
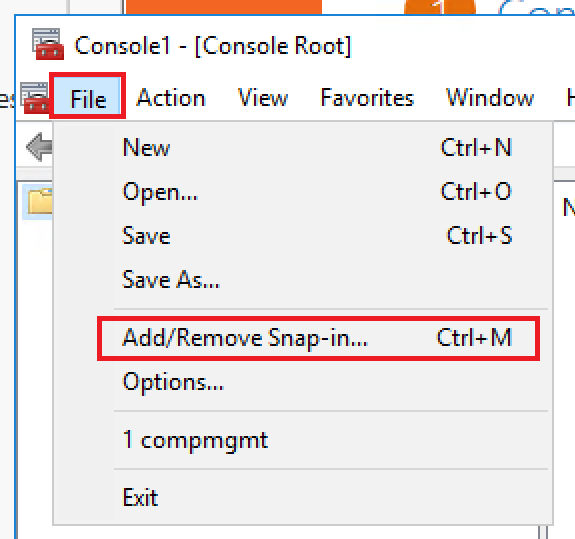
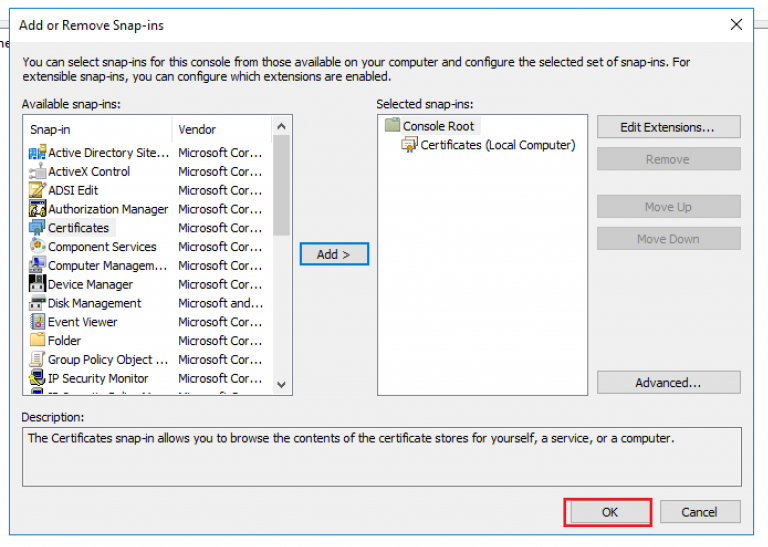
  3. Click file then Add/Remove Snap-in.
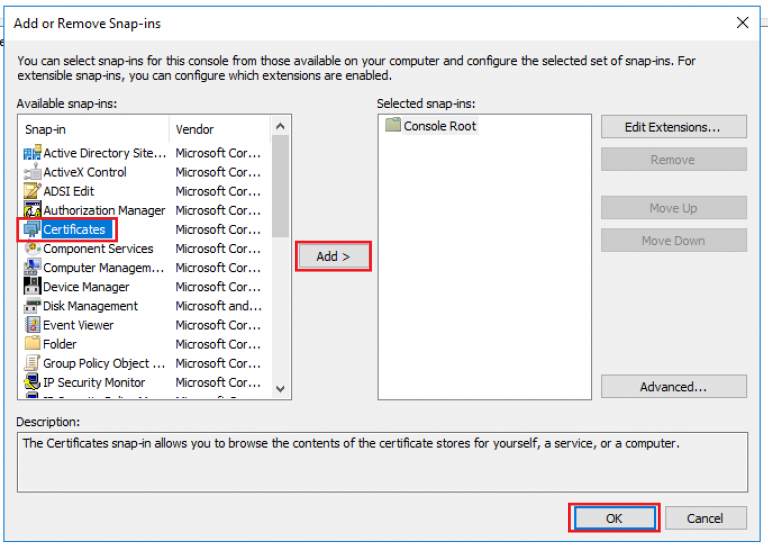
  4. Select Certificates -> Add -> OK.
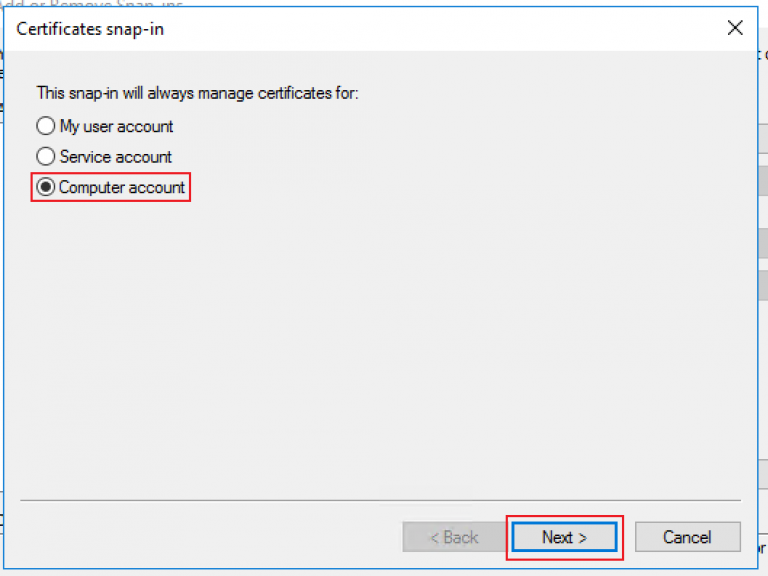
  5.  Select Computer Account -> Next.
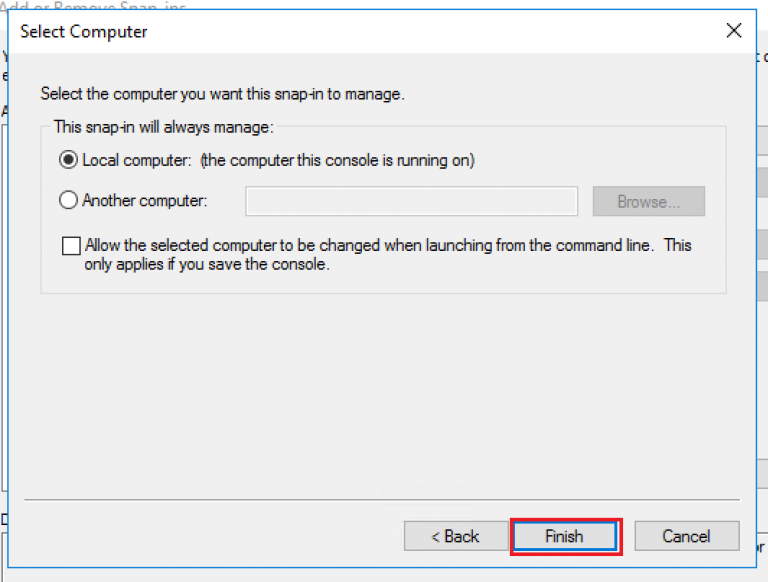
  6. Select Local Computer -> Finish.
  7. Click OK.
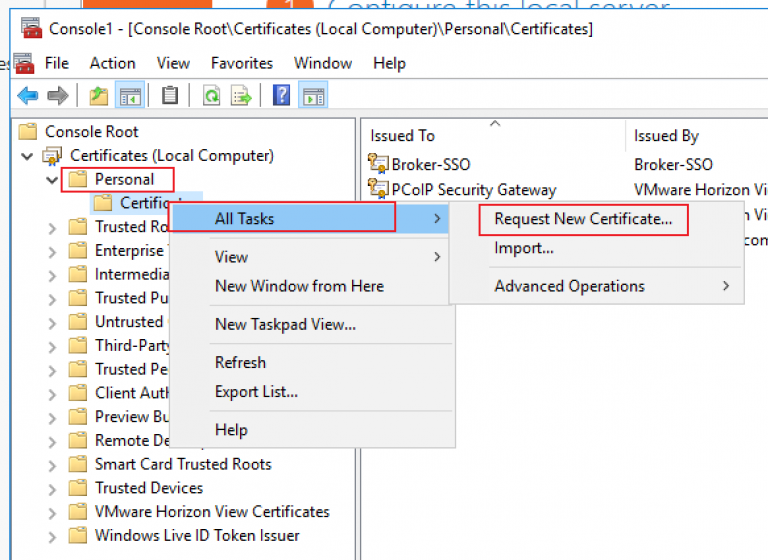
  8. Expand Certificates, Right Click on Personal -> All Tasks -> Request New Certificate…
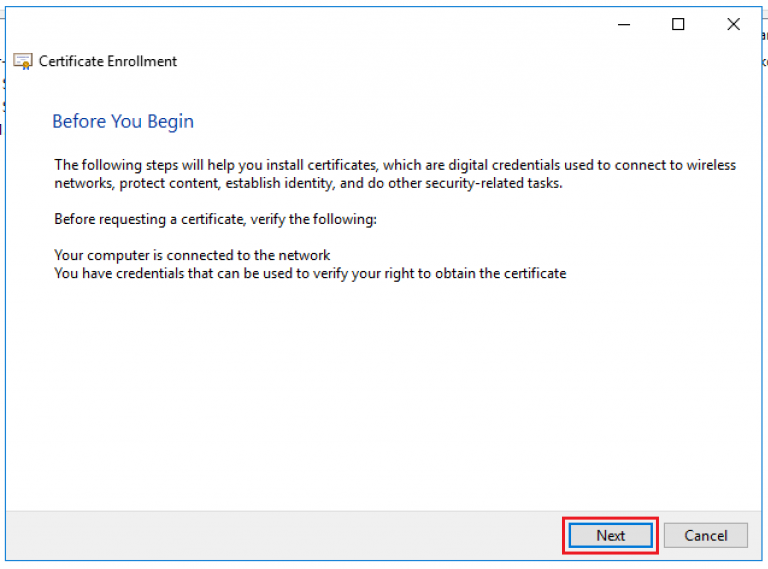
  9. Click Next.
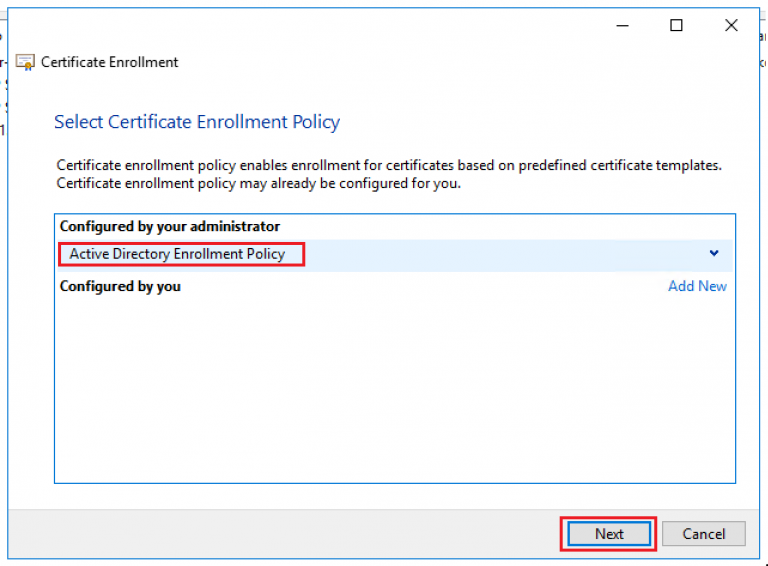
  10. Highlight Active Directory Enrolment Policy and click Next.
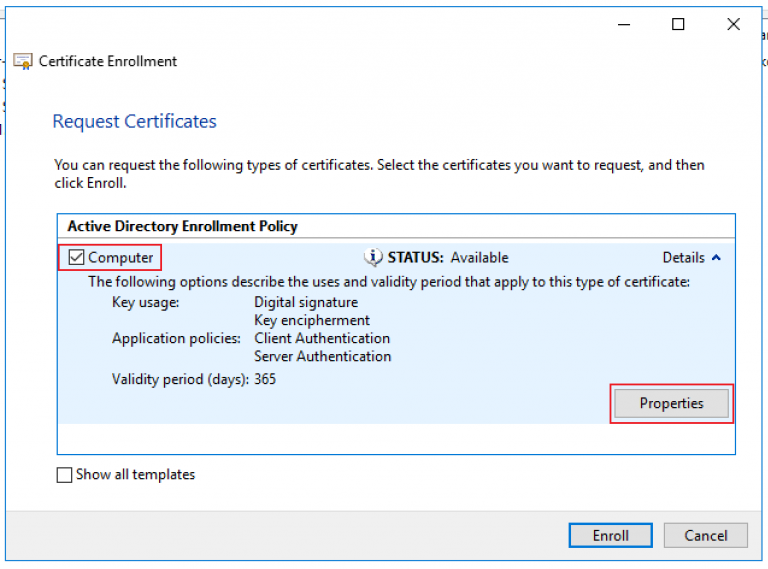
  11. Check Computer, expand the Details and click Properties.
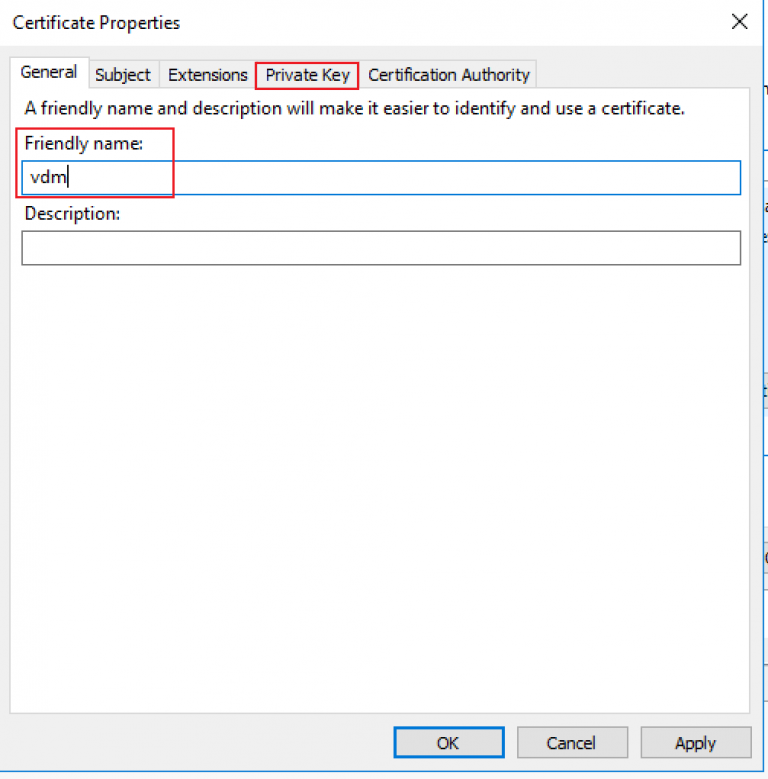
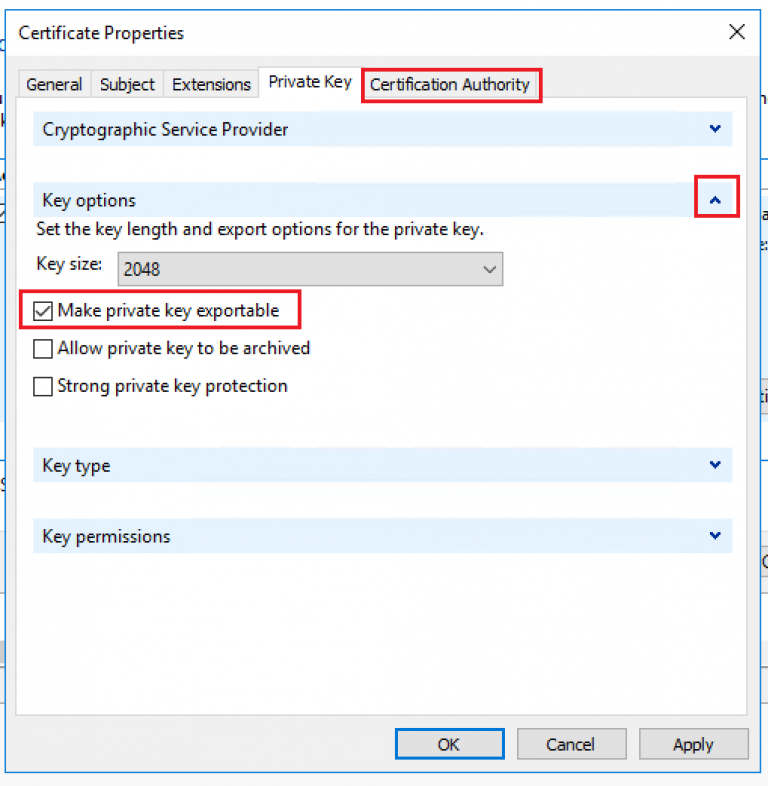
  12. Type vdm in Friendly name  and select Private Key.
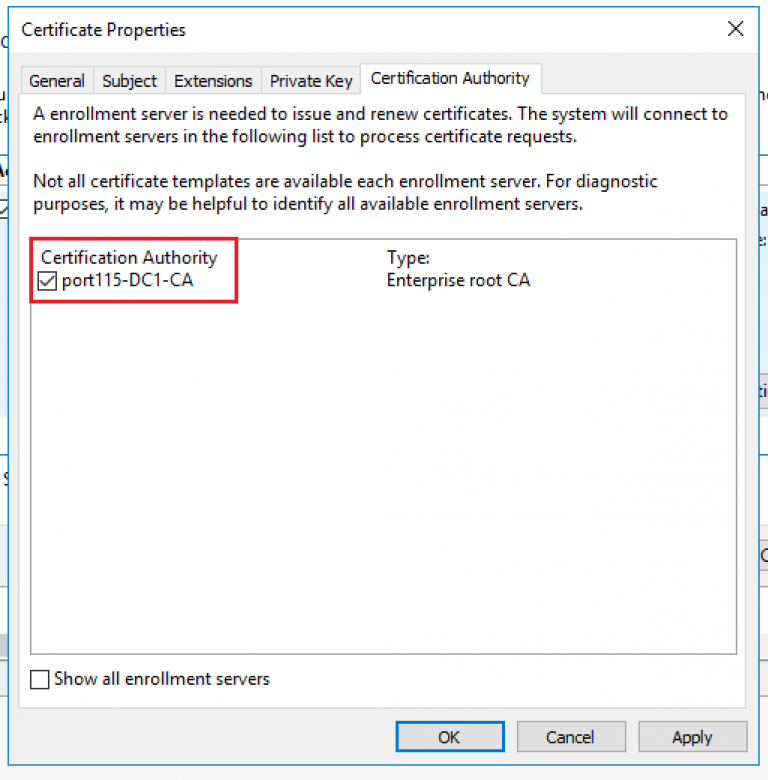
  13. Expand  Key Options and select Make private key exportable. Select Certification Authority.
  14. Make sure the correct certificate authority is chosen anf click Apply.
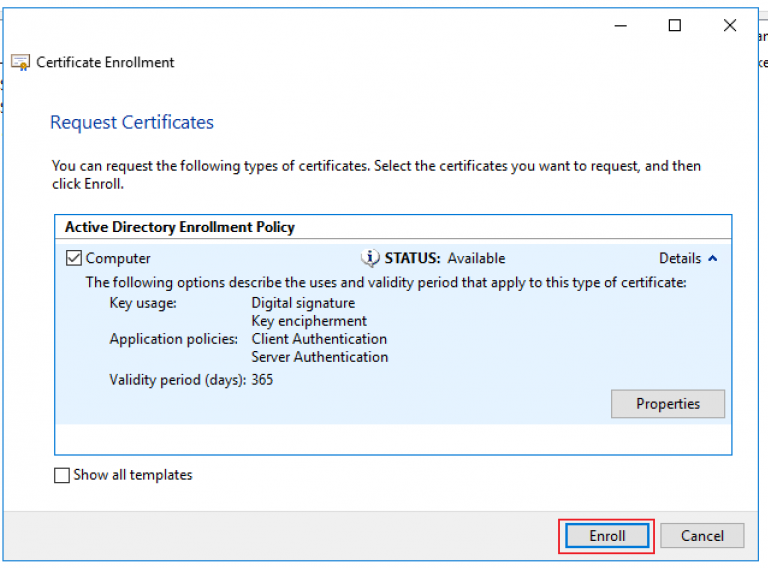
  15. Click Enroll.
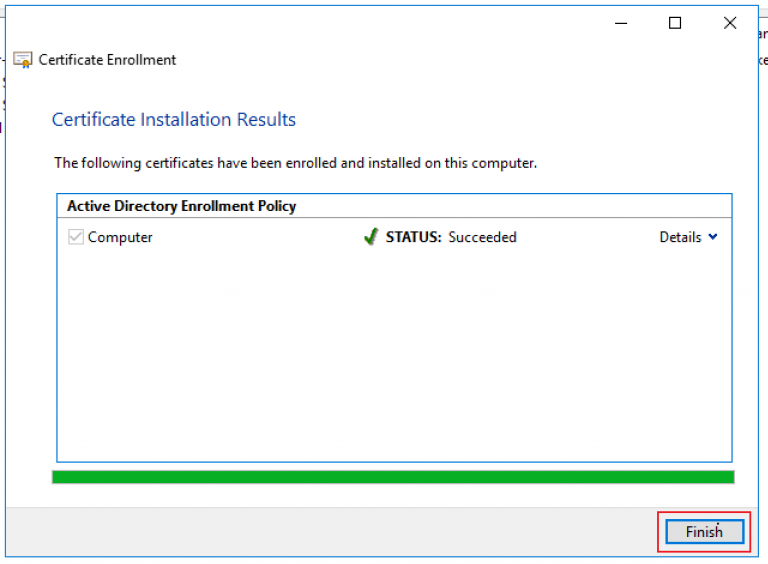
  16. Once the certificate has been issued click Finish.

Once the certificate has been installed you’ll see a new folder under Personal called Certificates. In there you’ll find the certificate issued by the root CA.

Preparing for Horizon View – If using SQLExpress

Quick Post

As a database SQL Express is pretty good. It has size restrictions built in but it is a full working MSSQL database engine and works quite well with Horizon View, although not supported at all.

To be able to connect to it from another server, one running the Horizon View connection server for example, you’ll need to enable TCP connections.

  1. Start the SQL Server Configuration Manager.
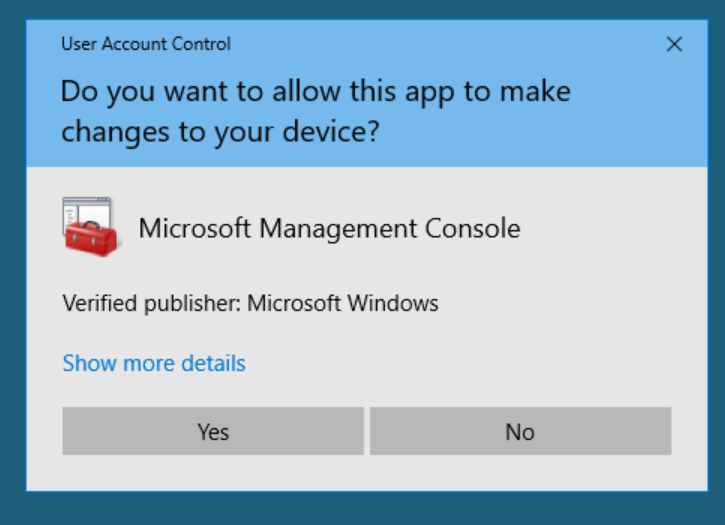
  2. Click yes
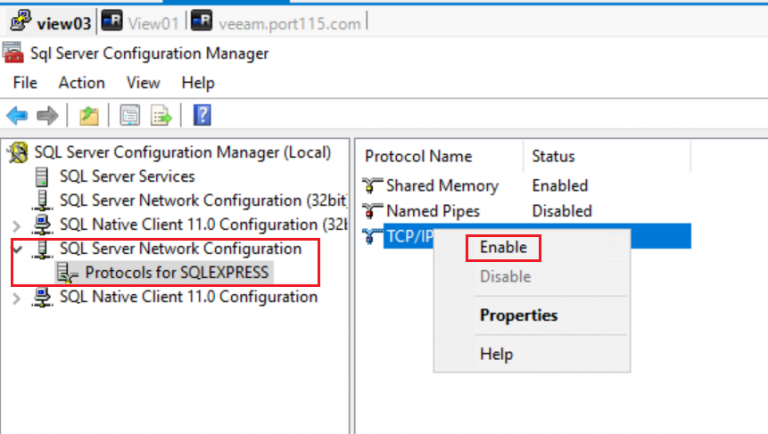
  3. Expand SQL Server Network Configuration, Select Protocals for SQLEXPRESS, Right click Enable. Once the status reads enabled, right click again and select Properties.
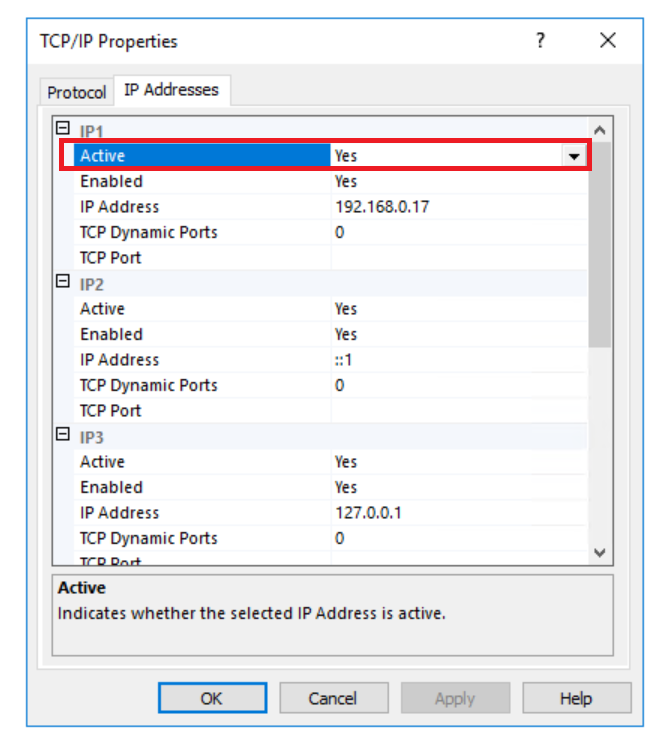
  4. In the entry for the IP address of the server switch Active to Yes.
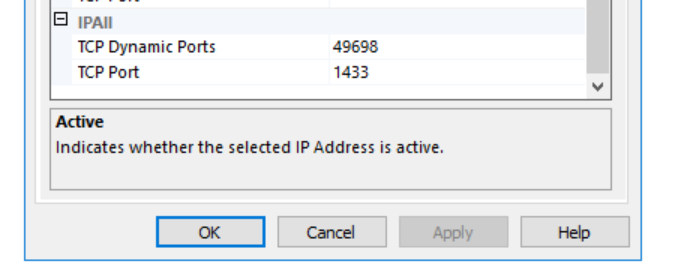
  5. Scroll down to the bottom of the window and under IPALL set the TCP Port to 1433.
  6. Restart the Server

This and allowing incoming connections through the firewall got me connected and using the events logging in the Horizon View Connection Server.

Preparing for Horizon View – Setting up a root CA.

While Horizon View does come with self signed certificates but it is always best, in a production environment, to your own SSL certificates.

I connect to my lab remotely using, either my laptop, or other mobile device and like to know that my connection is secure.

If you don’t want to setup your own cert server Lets Encrypt is a public CA and does offer certificates (wild card certs too) for free. If you do choose to use them please consider donating. They are an opensource and free setup and could use your help.

Installing a root CA.

I used a windows 2016 server for this deployment.

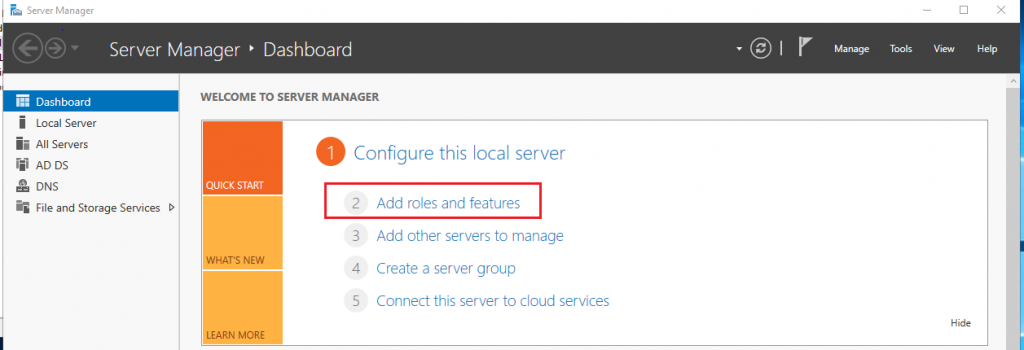
  1. In the Server Manager window click on Add roles and features.
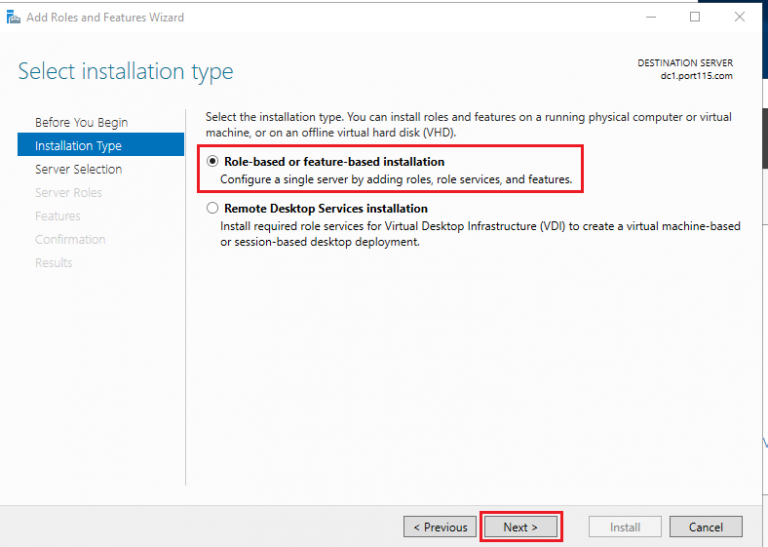
  2. Select Role-Based or feature-base installation and click Next.
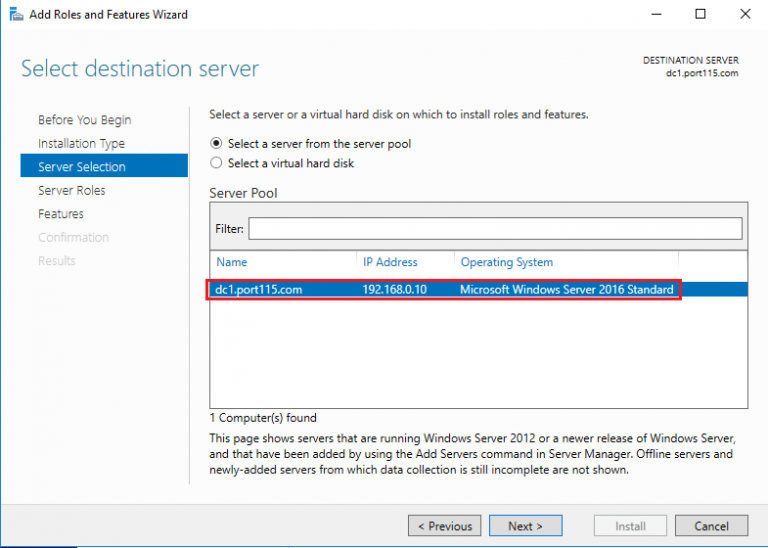
  3. Select the local server and click Next.
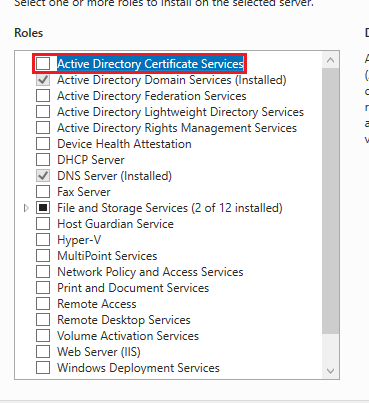
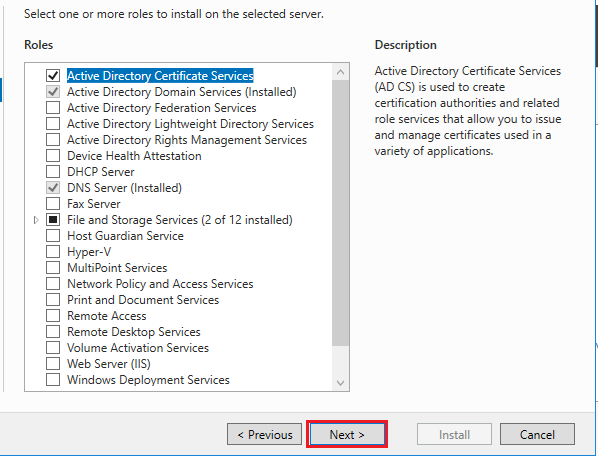
  4. Select Active Directory Certificate Services, and click Next.
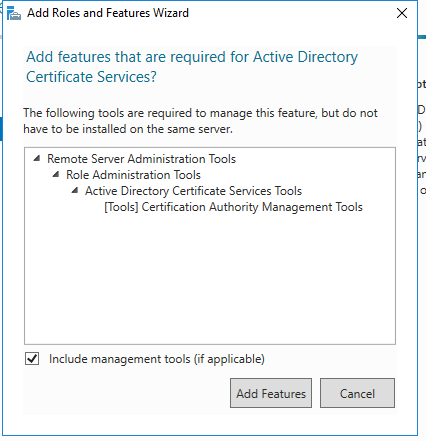
  5. Check Include management tools (if applicable). Click Add Features.
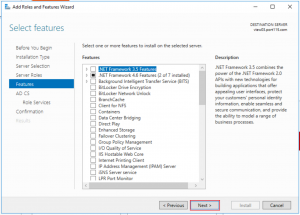
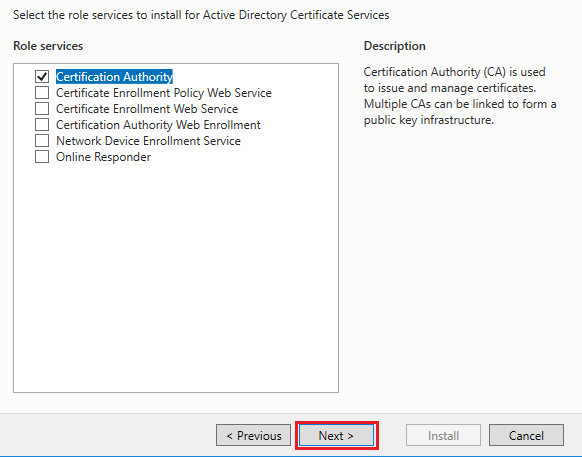
  6. Click Next.
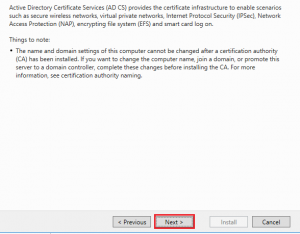
  7. Click Next.
  8. Click Next.
  9. Click Next.
  10. Select Certificate Authority. Click Next.
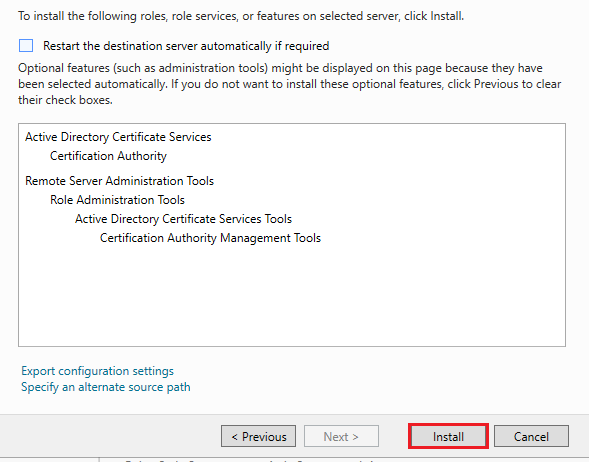
  11. Click Install.
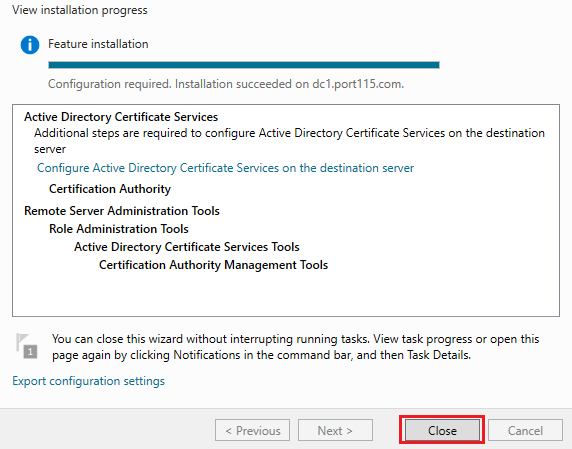
  12. Once the install is complete Click Close.
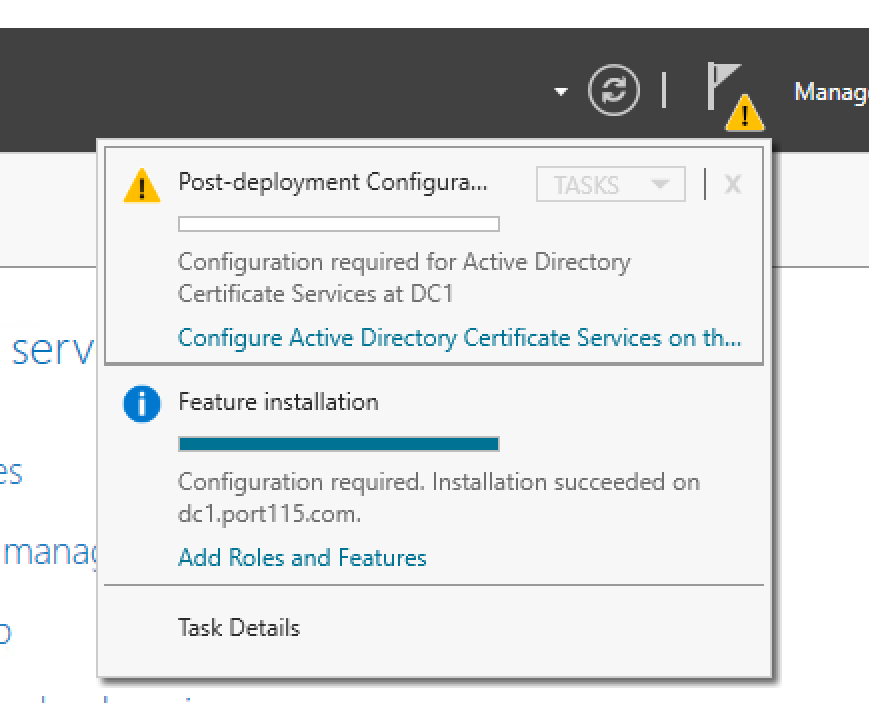
  13. Once the Install is finished we need to complete the post install tasks. Navigate to Server Manager and click on the alert icon. Click on the post deployment task that needs to be completed.
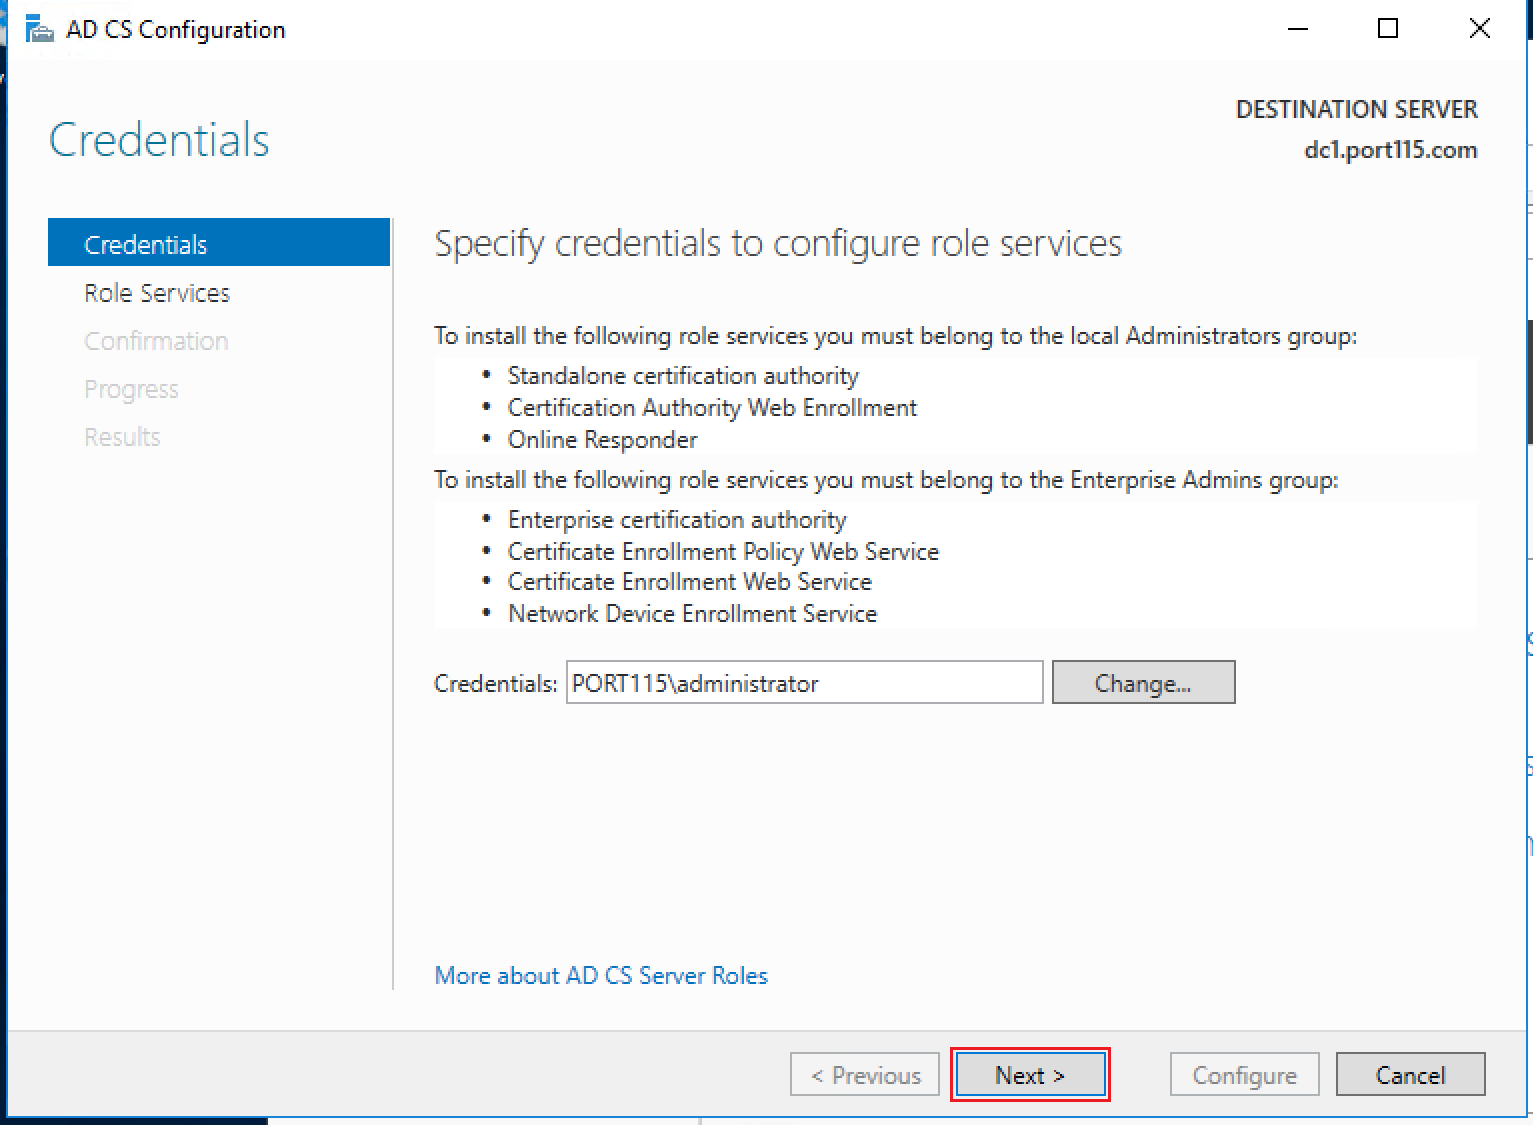
  14. If you need to change the credentials do so here. I just used the creds I was logged in with. Click Next.
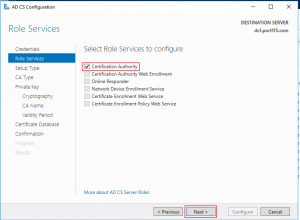
  15. Select Certification Authority and click Next.
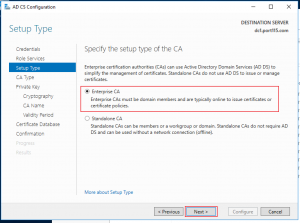
  16. Select Enterprise CA and click Next. You can select Standalone CA if that’s what you need. The options might be slightly different.
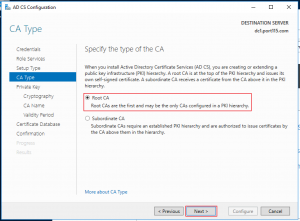
  17. Select Root CA and click Next.
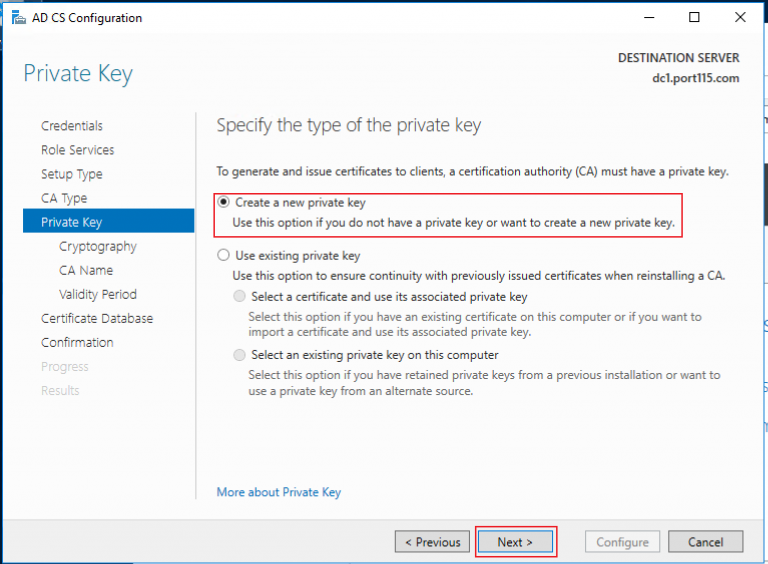
  18. Select Create a new private key and click Next.
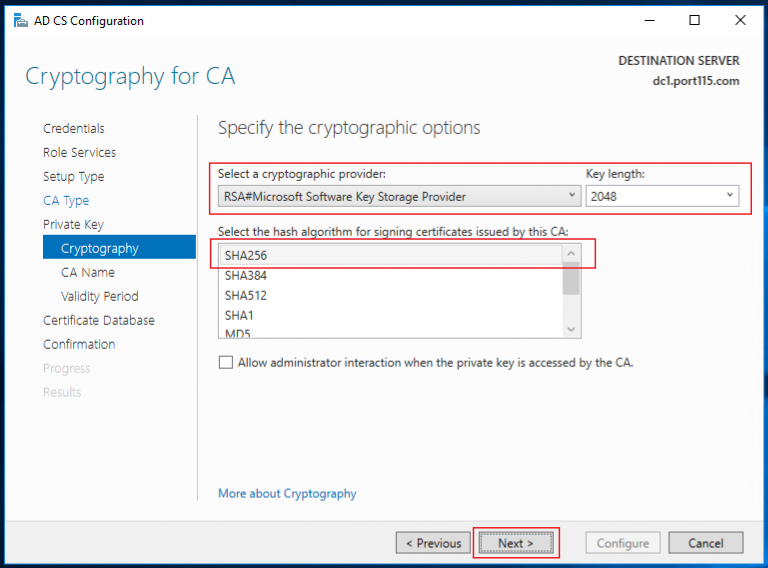
  19. Select the following:
    1. Cryptographic provider – RSA#Microsoft Software Key Provider
    2. Key length – 2048
    3. Algorithm – SHA256
    4. Click – Next.
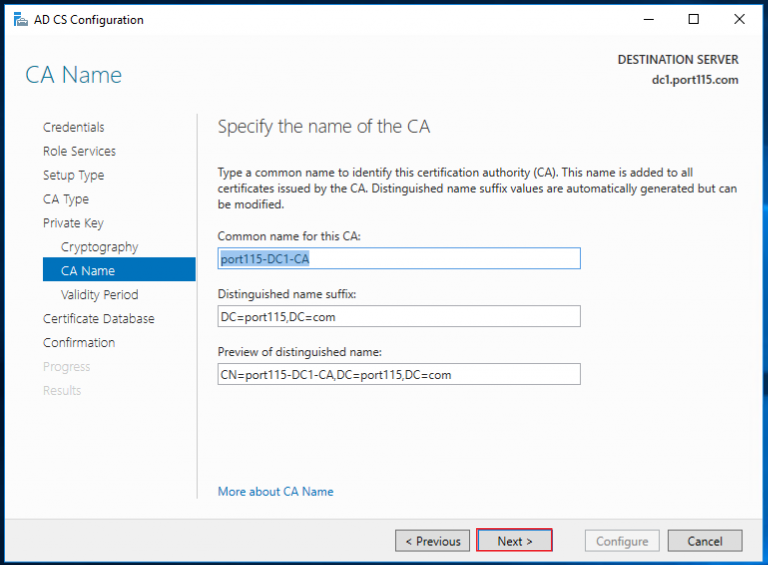
  20. Leave the defaults and click Next.
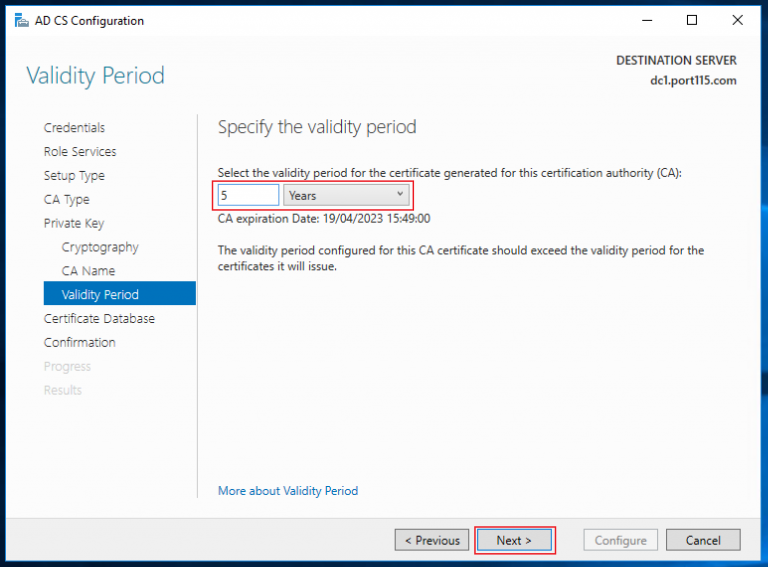
  21. Select the validity period of your certificate. (I chose to leave it at 5 years. In a prod environment you might want that to be less). Click Next.
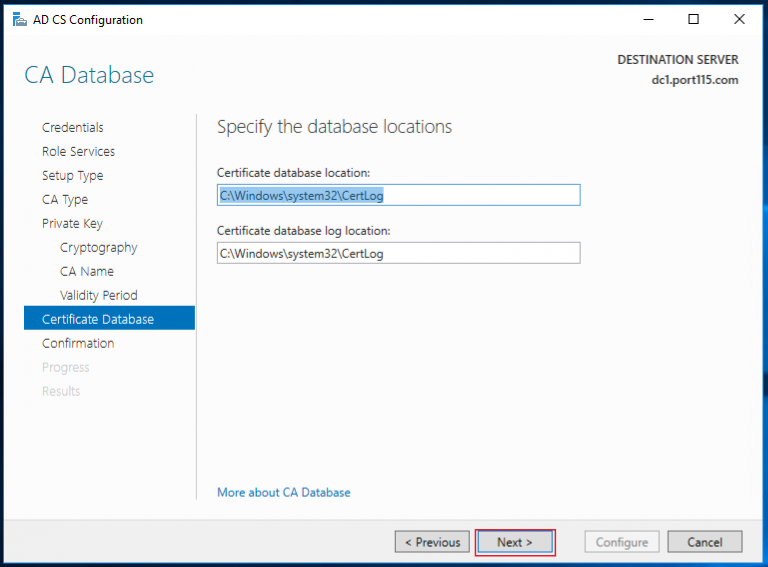
  22. Leave the defaults and click Next.
  23. In the final window check your settings and click Install.

And that’s it, we now have a working root CA!


Working VMware’s VDI Solution.

Over the last couple of months (with another work colleague) I’ve been looking into Horizon view 7.4. (edit: and now 7.5)

So far I really like what I see. It looks like VMware has put  fair amount of effort in the the product lately. From instant clones (windows and Ubuntu) to automated full fat clones for Linux, the product is really starting to look slick.

The next series of blog posts will be covering the installation and configuration of Horizon view, setting up various different solutions (Linux desktops, View security server and as an alternative the Unified Access Gateway, etc) and will take a look at the various “additionals” available, this includes the paks for vRealise Operations Manager and Log Insight.

So what will we need and be setting up to get the basics going?

  1. Lab (I’ve covered how to build this a while back, its a bit old but should still get you started).
  2. Certificate Authority for our domain.
  3. SQL server 2016 Express and SQL server 2016 management tools. Note: While the express version of SQL sever isn’t on the interoperability matrix it does work.
  4. A minimum of 3 Windows servers which will run:
    1. View Connection server
    2. View Composer Server, which will also run our instance of SQL express.
    3. View Security Server
  5. Horizon View Software (Download the lot)
  6. Windows 10 Enterprise
  7. 2 Popular Linux Disto’s.
    1. Centos
    2. Ubuntu

While there can seem to be quite a lot of moving parts, I would expect most prod environments to have access to either SQL standard as a minimum or Oracle (12C standard release 1 and 2 are supported) as well as a CA (certificate Authority).

Our three windows servers, which will form the base of our deployment,  will be configured as follows:

  • Windows 1 – Connection server
  • Windows 2 – Security Server
  • Windows 3 – Composer and SQL Express server

Before we run through the View install’s I’ll first go through setting up and configuring the CA, getting the cert onto the windows connection server, and configuring SQL for the two DB’s we’ll need.

Getting William Lam’s Awesome ESXi 6.5u1 Virtual Appliance to run in Fusion and Workstation (The Lazy Way!)

William Lam, The Official (to me anyway) master of nesting just about everything, has been putting together ESXi virtual appliances for quite some time.

You can find them over here:

Before you read on, please note that all the hard work has been done by William Lam and if you live under a rock and haven’t come across his website  before please go and check it out over at https://www.virtuallyghetto.com.

Honestly, once you’ve rebuild your lab more then twice the novelty wears off fast. That’s what makes these appliances are incredibly convenient.. It takes literally 2-3 minutes to have a fully functioning deployed Nested ESXi host, with all the little bits and pieces of config and vibs you would normally have to go in and setup yourself. Only one small problem, while it deploys into ESXi just fine and dandy, it doesn’t deploy onto fusion/workstation because it has virtual hardware that just isn’t compatible with Fusion/Workstation. 🙁

BUT the 6.0u3 VA does deploy without a problem.

Lazy Method:

  1. Download both the ESXi 6.0 Update 3 Virtual Appliance and the ESXi 6.5 Update 1 Virtual Appliance.
  2. To keep things neat create two folders called “ESXi6.0” and “ESXi6.5u1”.
  3. Extract both OVA’s into their respective folders. You can do this with with winrar (on widows) or if you’re using Linux/Max, from the console move into the directories and run “tar -xvf <name_of_ova>”
  4. Browse into ESXi6.5u1 and delete the ovf file.
  5. Copy the ovf file from ESXi6.0 to ESXi6.5u1. 
  6. Using your favourite editor open Nested_ESXi6.0u3_Appliance_Template_v1.0.ovf
  7. Do a search and replace for anything that reads “Nested_ESXi6.0u3_Appliance_Template_v1.0” with   “Nested_ESXi6.5u1_Appliance_Template_v1.0”
  8. Save “Nested_ESXi6.0u3_Appliance_Template_v1.0.ovf”
  9. Rename “Nested_ESXi6.0u3_Appliance_Template_v1.0.ovf” to “Nested_ESXi6.5u1_Appliance_Template_v1.0.ovf”
  10. Delete “Nested_ESXi6.5u1_Appliance_Template_v1.0.mf”
  11. Import into Workstation or Fusion
  12. Once the Nexted ESXi host has booted for the first time and run the config scripts. You’ll need to power it down and set VT-x/EPT support for the virtual machine. (I’ll add it in to the ovf instructions soon).

It’s really that simple (or lazy)!!!


Creating Project Cheat Sheets

So you’ve done your POC, your solution has passed all the tests required by the company, you’ve put together your final design document (a hearty 95 pages) and managed to navigate the frustrating world of board level approval.

Now what? Well you begin to work with the other engineers, from other disciplines, and build, build, build. They’ve read your design document and are eager to get to work. The only problem is that this isn’t the only project they are working on,  every time they need to do something they need to dip into your 95 pages of awesome design, or bring it up in the next project meeting. Infact maybe its just easier to just call you… right when you are in the middle of figuring out why the output from the powercli script you have been working on all day is showing a sea of red.

This happens to every VMware engineer.

What I have found helps is to create cheat sheets for the technical members of the project. It’s very visual and contains most of the info that they will need. It’s important to note that this isn’t the design document but should be supplementary to any project documentation.

  • Ex. Page 1 – Summary
    • Brief overview of what going in.
    • Physical Dependancies
  • Ex. Page 2 – Hypervizor details
    • Hardware config
    • Firmware revisions
    • Host Configuration
      • OS + version, License, NTP, DNS, basic networking, Cluster config
    • Virtual Infrastructure Config
      • VM Standards (hardware version, pvSCSI, vmxnet3, etc,etc
      • VCSA – Size, version, location
      • PSC – Size, version, location
      • VUM – OS, Version, ;location, Database type
      • Database for VUM – OS, DB type, verison, name, location
  • Ex. Page 3 – Core Virtual Networking
    • Diagram – How it all fits together

The 3 examples I have given below are from different projects but will show you what I usually put in.

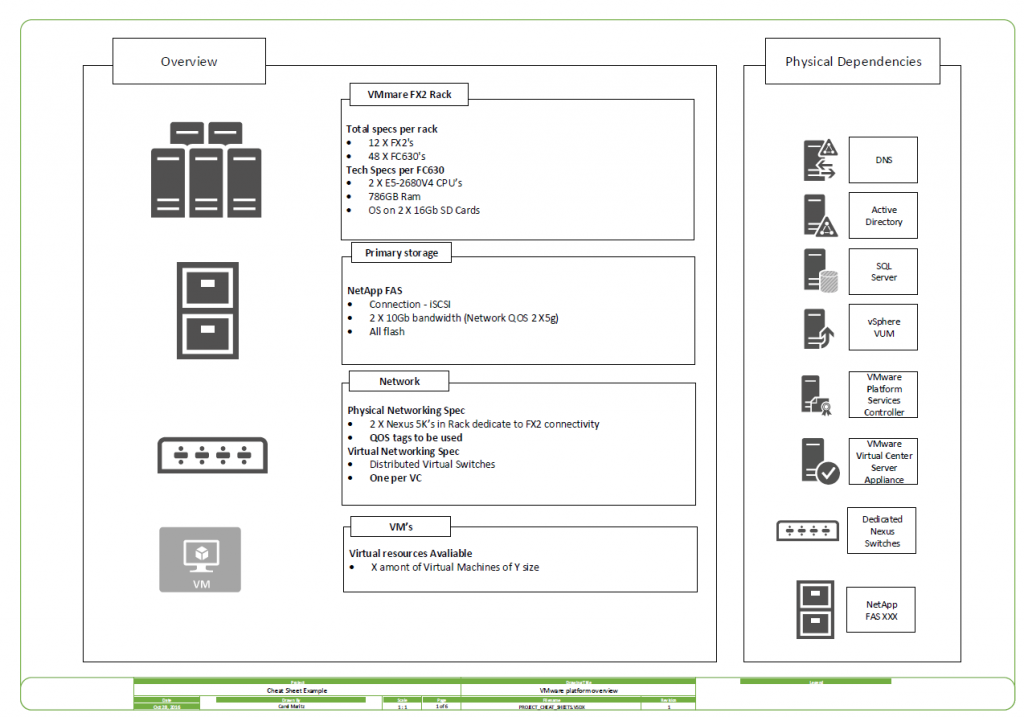
Example Page 1 – Summary.

This page is your summary. It has some light technical bits that can quickly be referenced. The overview pane is what’s being put in. You could possibly add a sub section about the OS. No real need to put version numbers in here.

cheet_pg1

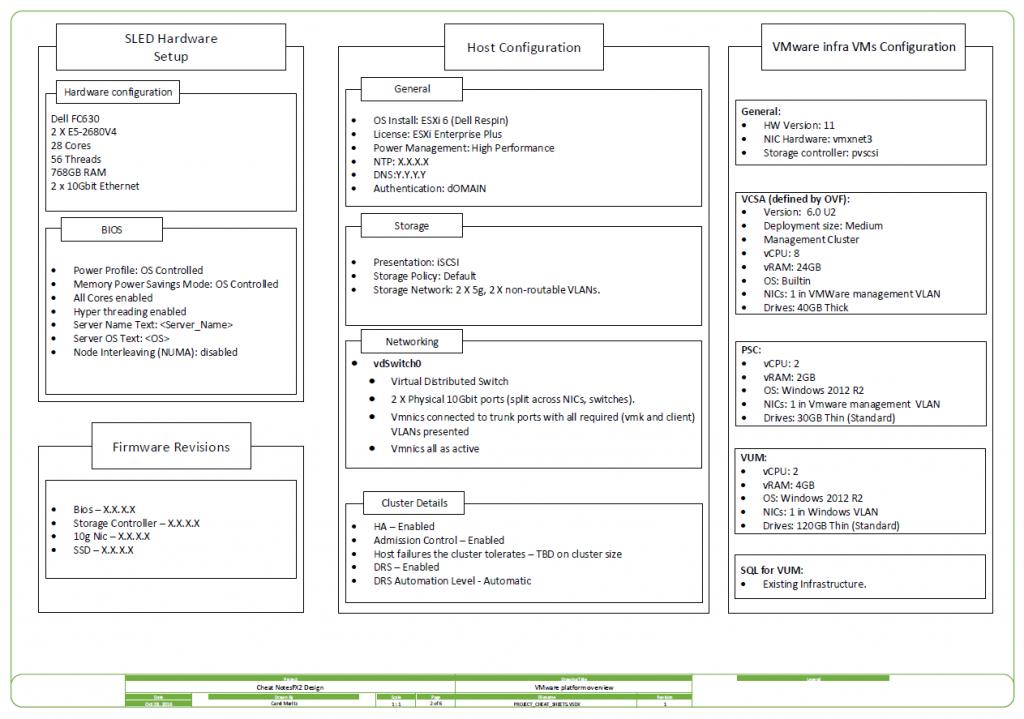
Example Page 2 – VMware Specific

This page is hold details for Ops and the VMware team. With this information you could reasonably expect an engineer or OPs to build out your cluster at the basest level.cheet_pg2
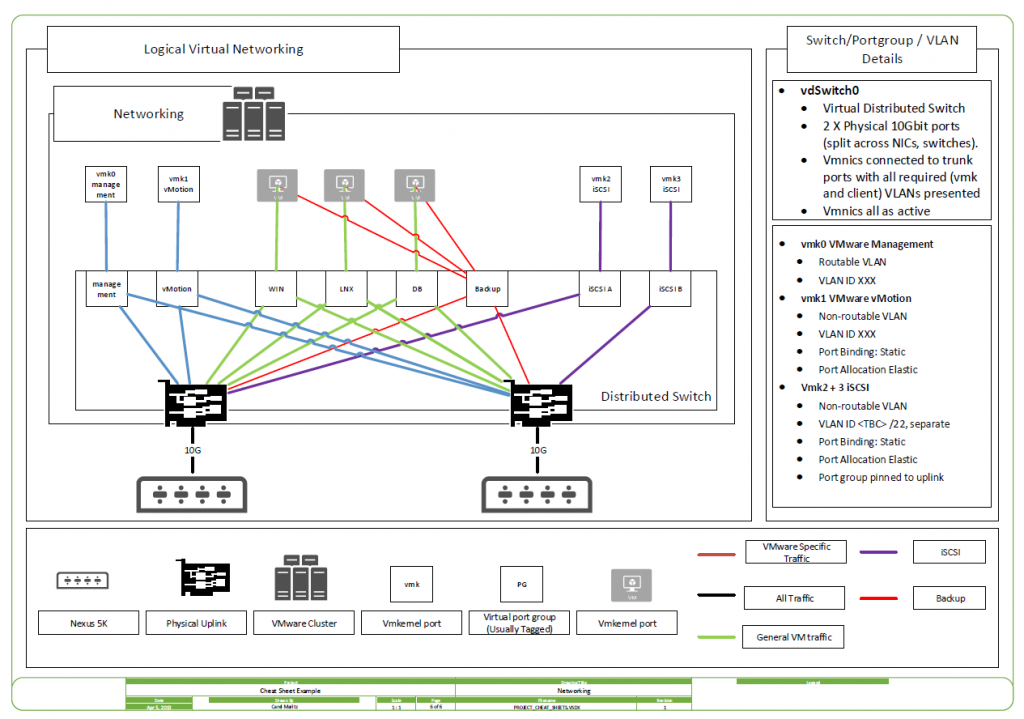
Page 3 – Virtual Networking

Very visual. So here, which I haven’t done, you could supply additional info about active and standby paths, any additional info for any NOIC specific settings you have chosen.

cheet_pg3

The above examples should give you an idea of how they could look and are by no means an exhaustive list. You could add a rack diagram, storage config, etc,etc.

The point is for these documents is to be quick reference pages highlighting the decisions made. I hope the idea helps you, its certainly a help to me.