How to setup Dynamic Environment Manager – Intro

[Edit – 31/10/19 – Updated for Dynamic Environment Manager]

In the next few posts wel’ll look at setting up Dynamic Environt Manager. User Environment Manager or Dynamic Envirnment Manager as its now called is a very powerful tool for EUC. It gives admins a very flexable way to configure desktops without needing to work the base image. VMware are pushing it as a replacement for Persona Manager, which makes sense as then they do not need to support two products. Persona manager can be configured to use physical as well as virtual desktops.

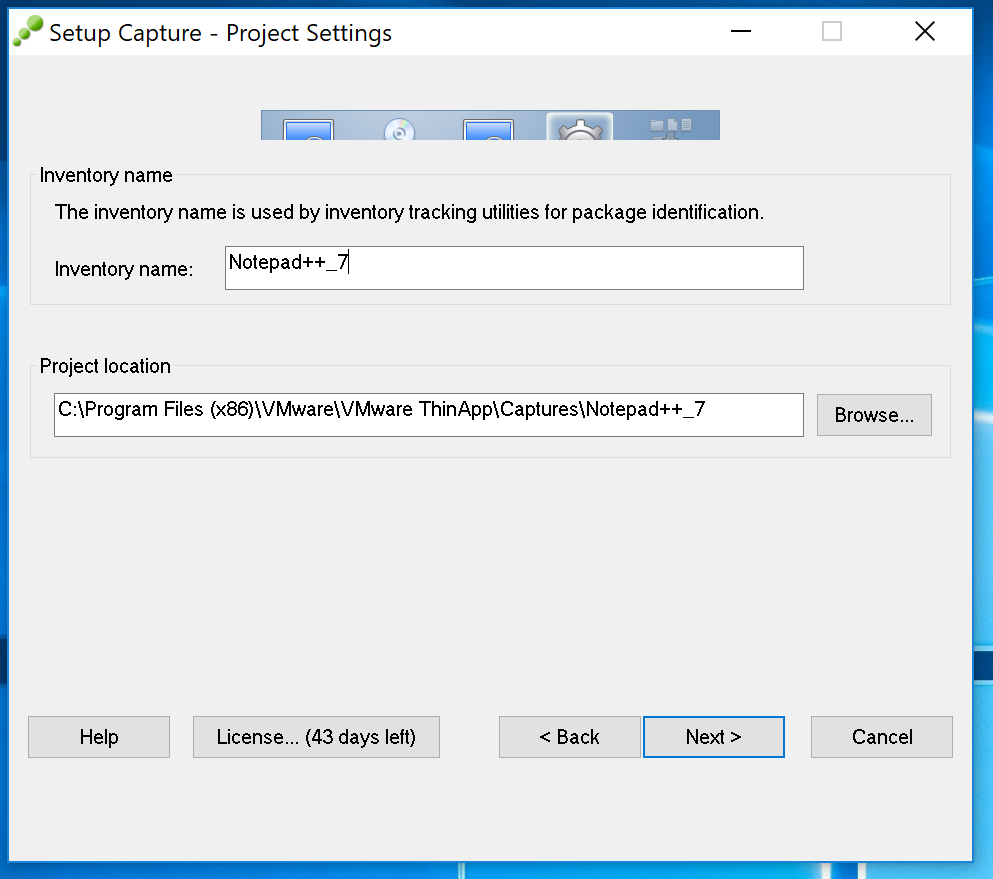
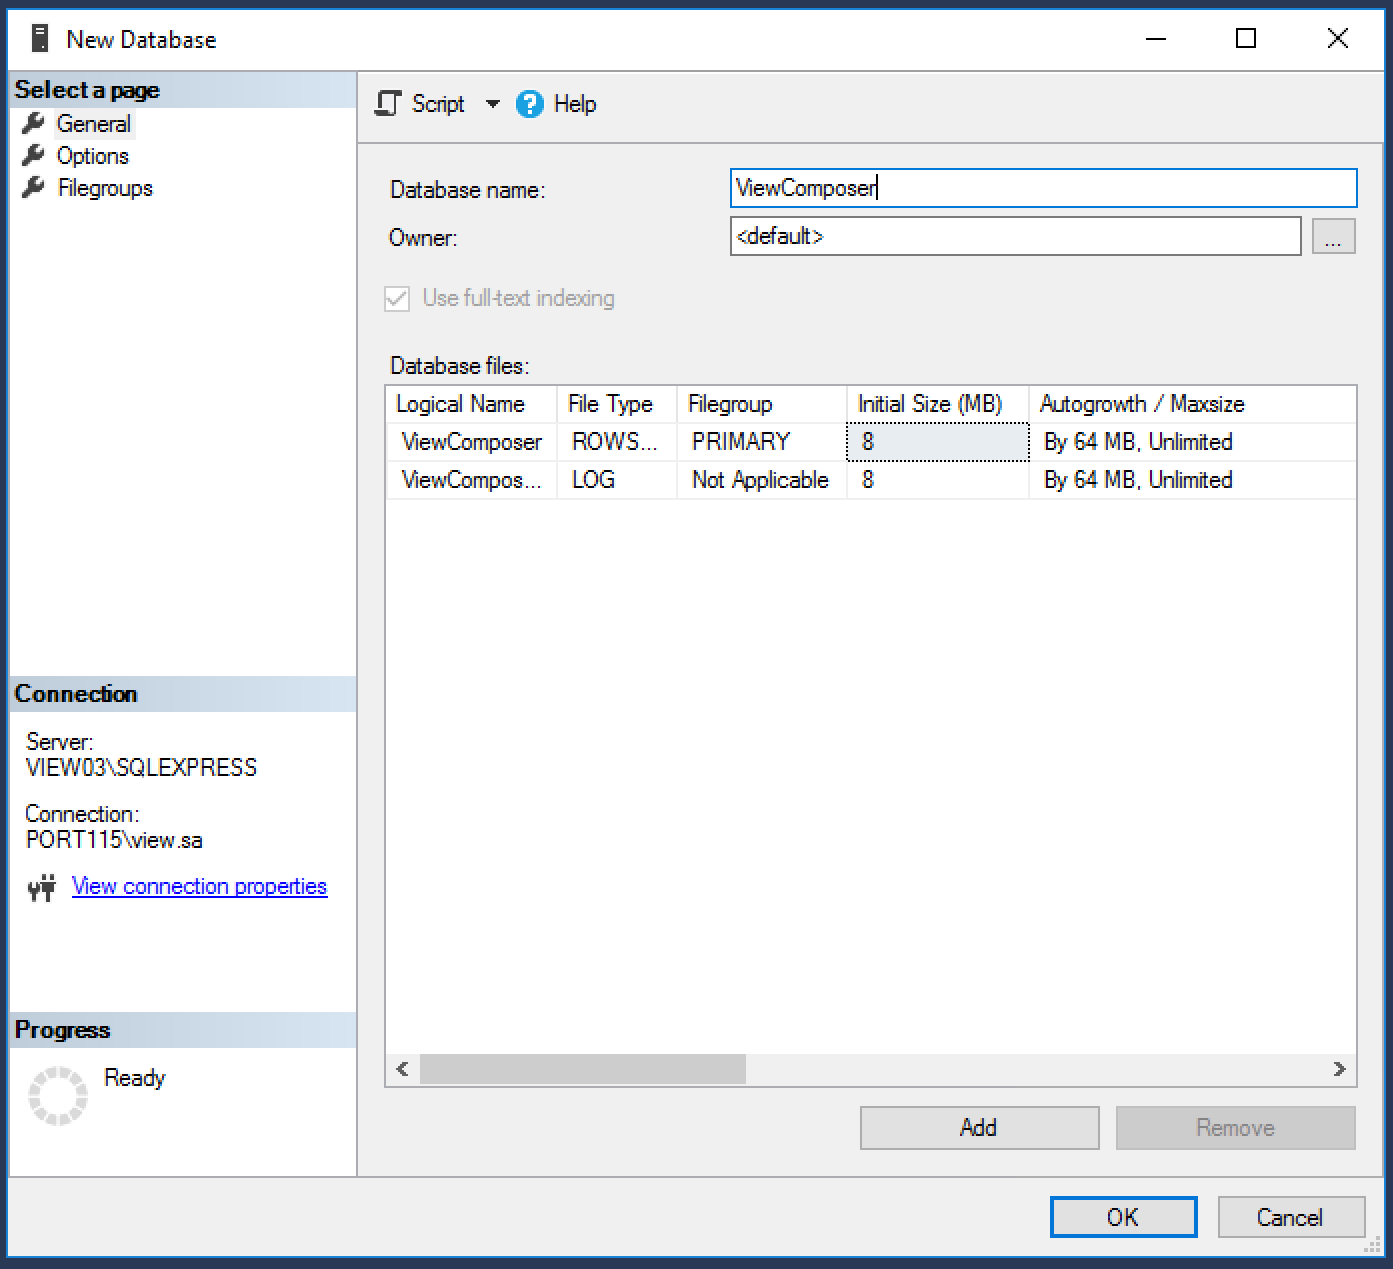
DEM can have its initial config delivered through GPO or, in the case of noAD mode, an XML file. Infact all configuration is pickedup via XML files. The management dashboard is a local install of a few hundred MB which you point at the file share, and really only makes sure the formatiing is correct. All the hardwork is done via the agent. There is an argument to be had about whether or not to have some of the desired config baked into your parent images. I prefer to have as much of the the config delivered via DEM as possible to prevent any more recomposes than nessesary.

I particuarily like the fact that this product does not need a server backend and can run without the need for active directory GPO’s. Infact to get up and running there are only 4 things to setup.

  1. File share and correct permissions
  2. The Managment interface
  3. The various customisations you’d like
  4. And (obviously) the agent on the parent image (or physical machines

The next post will look at getting the file share setup.


How to setup ThinApp and package an application.

I like ThinApps, I really do. They’re efficient, easy to create, portable and they just work (most of the time). They can be streamed, deployed locally, and are a great way to run older, legacy apps on later OS’s (although the last bit might not technically be supported).

We’re got to go through the process of installing ThinApp and then creating our own ThinApp. It’ll be a basic app but will still work.

Before we start you’ll need the following:

  • A clean install of windows, in this case I’m using Widows 10.
    • Fully patched
    • My preference is to have no AV installed. It doesn’t really matter as we’ll be rolling the VM back to a clean snapshot at the end.
  • The Thinapp Installer which can be downloaded from VMware’s website
  • An app to install and package. Make sure its from a trusted site. I’ve used Notepad++ for this particular post.

Deploying ThinApp Enterprise.

  1. On your “clean” VM, run the ThinApp installer
  2. Accept the security warning. Click Yes.
  3. You’ll be presented with a patent wall. Click Next.
  4. Like everybody does, read the License agreement and Select “I accept the the terms of the license agreement.” and click Next.
  5. Here you’ll need to enter in your Horizon View License and give it a name. Click Install.
  6. Once the installer is done Click Finish.
  7. You’ll now see three new icons in your Start Menu.
  8. Now that we have ThinApp installed, Shut down your VM and take a snapshot. You’ll want to have a clean state every time you go to package a new app.

Packaging an App.

Our first App is going to be Notepad++. Its a great little app and, in my opinion, should be part of any VDI deployment.

  1. Start ThinApp Setup Capture.
  2. At the User Account Control, Click Yes.
  3. Click Next.
  4.  Here we’ll trigger the prescan. This is where ThinApp goes off and profiles the current system state, hence the need for a clean system. Click Prescan.
  5. Go ahead and install you app. I would strongly recommend that you start it at least once, to finish any post install config, before clicking Postscan, which will trigger a second profiling of your system to see what has changed.
  6. Just to confirm what I said above. Click OK.
  7. Select the Executable file. I’m installing NotePad++ here so it makes sense to select the notepad++.exe executable. As its a ThinApp I’ll not be needing any of the other executable. Click Next.
  8. We’ll be importing this into our connection server later so won’t be managing this with VMware Workspace.
  9. I want everybody to be able to run this but you might want to restrict it to certain groups. Click Next.
  10. I’m installing an editor so it makes sense to me to have it be able to access as much as possible. Click Next.
  11. We’re running this app through Horizon View and want the setting and hostpry to persist so I’ll leave the default here. Click Next.
  12. So this step depends on your companies security policy. Most I would imagine don’t want any information sent out. I’m using this in a lab so I don’t mind to send the usage info out. Make your selection and Click Next.
  13. Name your App. I’ve kept the default but added the version number. If you have a central location for your apps, you can also set it here. Click Next.

  14. IThe package settings are usually fine as they are. I did however select Generate a MSI Package. In the next post we’re going to look at the two ways to deploy a ThinApp though Horizon View. Click Save.
  15. All the various changes that were made during the App install, such as file creation, reg keys, etc. Will be put into a build folder. This can take a while depending on the size of the App.
  16. And now we get to trigger the build, you have the option of editing the ini file to change some of the more advanced options that were not available during the profiling.. This can take a bit of time. Click Build, and go get yourself a coffee.
  17. If successful you’ll see an output similar to the below.
  18. Your app is built, packaged, and put into the specified folder. As you can see I have two files; one the exe that I chose as the entry point, and the other is the MSI, which we”ll use in the next post.
  19. Once you’re done, copy the files out of the VM and roll back the snapshot. Unless you are putting together a bunch of apps (which I wouldn’t recommend with ThinApp)  its always best to start in a clean state.

Packaging an App can take awhile but for some deployments it make perfect sense.

Horizon View – How to add a second Connection server (Replica server)

Looking at the design from the previous post we want to have a degree of redundancy and to do that we’ll need a second Connection server also known as a replica server.

We’ve already built our first connection server here and done some configuration here and some certificate stuff here.

Continuing on I’ll be using Horizon View 7.7, it is the latest and greatest (at the time of writing). I did redeploy my lab with 7.7, and the previous posts are still relevant if you’d like to back and inst all your own lab.

Before we begin make sure you have a Windows 2018 or 2019 server ready to go with a certificate installed.

Installing the 2nd Horizon View Connection server (Replica Server).

  1. Connect to the server you will be using as your Replica server.
  2. Copy across the installer and double click to run.
  3. Click Yes. To accept the UAC warning.
  4. Click Next.
  5. Select “I accept the terms in the license agreement” and click Next.
  6. Here you can change the installation location if you prefer. Click Next.
  7. On the Installation Options window:
  8. Select Horizon 7 Replica Server as the install.
  9. Select  “Install HTML Access”, this is technically not necessary but I would recommend it, especially if you have enabled it on the first server.
  10. Select the IP protocol you use. IPv4 would be the most common I expect
  11. Click Next.
  12. Enter in the name of the first installed Horizon View server. Click Next.
  13. Select whichever is appropriate for your environment, bearing in mind that most companies will have the servers firewall controlled via GPO. So check with your Windows and Security guys. In this case I want the firewall of this server to be configured automatically. Click Next.
  14. Select whether you’d like the local Administrators Group to have Admin rights to view. This can be changed later but I generally prefer not to from the start. Click Next
  15. Click Install.
    At this point the installer will go off and install all the same bit and pieces that is needed for the connection server and then goes through a process of setting up synchronisation  between the two servers. Hat off to VMware here, this process is really well done.
  16. Click Finish
  17. If you log into your Connection servers and take a look under View Configuration you’ll see both Connection servers.

Now that we have the two connection servers, we can move on to the next topic and we’ll setup two App Volume servers and the post after that we’ll put together some apps.

Horizon View – Design and Considerations

During the last few posts we put together a SQL server, Connection Server, Linux desktop, setup certificates, and created a working Manual working desktop pool.. A Basic working deployment of Horizon View that’s good for kicking the tires but very labour intensive to maintain in production.

In a production environment there is much more to consider than just what we’ve thrown together. Availability, security, logging, monitoring, alerting, desktop pool. Desktop OS, budget, to name a few.

Before jumping in and creating an awesome design you’ll always want to find out exactly what the requirements are. “Because” is not an answer. For example, you should be asking questions along the lines of:

  • What do the different stake holders think they are getting?
  • What does your network look like?
  • What kind of security do you have between your networks and/or VLANs
  • Is redundancy and resilience a factor to consider, and yes, they can be different things.
  • Do you have approved Windows or Linux builds?
  • Patching schedule?
  • Do you have a standard user base, or is this intended for users with differing requirements? e.g. dev, eng, admin?
  • Does this service need to be available externally, or is it an internal service only?
  • Have you met with security?
  • Apart from the requirements, have you evaluated the risks and constraints?
  • In the absence of concrete answers have you made your clients/manager aware of any assumptions you’ve made? e.g. “The project plan assumes that the current in server disk controllers will be replaced with HPE P416ie controllers for VSAN compliance.”

When working out the Requirements, constraints, risks, and assumptions be specific. Ambiguous or open ended answers will lead to scope creep and make your job more difficult.

However for the next set of posts we’ll be going through and fleshing out the environment with these (very) high level requirements

  • n+1 redundancy of the VDI deployment.
  • External Access
  • Load balanced (If possible)
  • Two different types of users. Dev and technical admins
  • Two different desktop OS’s available.
  • Profile to persist between sessions.
  • Security – no copy and paste, 2FA, logging, only applicable ports open between VLAN’s
  • Monitoring

This is more that enough to get us going back and asking many, many questions but for now we’ll pretend that most of them have been answered.

So that we don’t go off piste too much I’ll be mostly sticking to a stripped down version of VMware’s reference Architecture for the mobility suite that can be found here but slightly modified. The diagram below is partially from the linked page and modified to fit into my lab (hopefully). I’ll also make sure I reference any other blogs that i pull info from.

P.S. For the ESXi servers, I’ll be using William Lam’s most excellent ESXi servers that can be deployed via OVA onto either ESXi or Workstation/Fusion

UK VMUG USERCON – 13 December 2018

If you haven’t been to a VMUG before I would highly recommend them. I can’t speak for other countries but the VMUG events in the UK are usually very good and the best of them is the Annual UK VMUG. Every year it seems to get bigger and better.

It’s more or less like a mini VMworld. There’s a space for the sponsors (tiny solutions exchange), lots of swag, food and of course various sessions, discussing a wide range of topics from vendor specific, to VMware cloud on AWS, to Automating VDI. Best of all the whole experience is free.

This year saw the event move from the National Motorcycle Museum to the National Space Centre in Leicester, which was an interesting choice. I did take a bit of time out to explore the center. Also this year, since I had decided not to go up the day before, I missed out on the vCurry.

Joe Baguley gave the opening keynote which went into a bit of detail about where technology has been, how its evolved, the IoT (Internet of Things) and also covered topics like the difference between machine learning and AI. Duncan Epping gave the closing session, looking at where VMware are heading, their focus, and how they intend to achieve it. Both very informative and funny to see them take friendly jabs at each other.

My three favourite sessions (in brief):

The first two sessions I attended were about VMware Cloud on AWS, the first was presented by VMware and the second by AWS. Both sessions were an introduction to the server but from different angles. It was actually quite interesting.</p?

After Lunch I went along to Automating VDI tasks by Michael McDonnell who was presenting work he had done with Chris Hildebrandt on automating key parts of a massive VDI farm. Of all the sessions I attended that day, this one was the most interesting. Chris has a GitHub repository where he publishes his code in addition to his blog.

I came away with quite a lot and not just the swag raid. It’s always good to connect with the community see some familiar faces and some new.

If you have the time and your work will let you go, VMUG’s are absolutely worth a visit.

Horizon View – How to create a Manual Desktop Pool

This is the most simple of pools that you can create. It requires a Desktop VM that has the Horizon view agent installed. It doesn’t really matter if its Windows or Linux as long as the Desktops are built and ready to go.

Before anybody asks, there are a few legitimate reasons that you’d want to have a manual pool. The most obvious be that the company security policy is that all Desktops need to be deployed from a central location such as a RedHat satellite server.

  1. Connect to your View Connection Server https://<connection_server>/admin with an account that has administrator permission.
  2. Expand Category and select Desktop Pools.
  3. Click Add.
  4. Select Manual Desktop Pool and click Next.
  5. Select Dedicated . Its up to you whether you select Enable Automatic Assignment. All it does is automatically assign a user to a free desktop, which will be a permanent assignment. Click Next.
  6. Select vCenter virtual machines. Click Next.
  7. Select your vCenter and clict Next.
  8. Fill in a name for the ID and a Display name. While you can change the display name, teh ID name won’t change. 
  9. In this page there a quite a lot of options you can configure, I’ll break them down in a later post but for now select HTML Access as this will allow us to connect to the desktop using a browser and click Next
  10. Select the VM’s you’d like to add to the pool, click Add and click Next.
  11. Click Next
  12.  Select Entitle Users After this wizard Finishes to add users. `This will allow you to add users after the wizard finishes. Not necessary but a bit of a time saver. Click Finish.
  13.  Once you’ve finished the New Pool wizard the entitlements wizard opens if you’ve selected it in the previous step. Click Add.
  14. In the Name/User name box type the name of the group or user you’d like to add and click find. Once it appears, select it and click OK. In production environments you’d usually add an AD group rather than an individual user. This allows for greater flexibility and monitoring.
  15. To entitle other groups or users click add or if you are finished click close.

Testing our new pool.

  1. Log out of your Connection server and connect back to the server but this time without the /admin. just https://connection_server; Log back in as a regular user that is entitled to the Desktop pool
  2.  Click VMware Horizon HTML Access.
  3.  Enter in your username and password, and click Login. 
  4.  Select the pool you created earlier. In my case I called it Manual_01. 
  5.  If everything went according to plan you’ll now have access to your VM.  

Troubleshooting:

  • If you experience issues connecting via the web interface go back and have a look at step 9, did you tick the box to enable HTML access?
  • Can you connect using the full client?
  • Check the firewall on the Desktop OS. The agent on the desktop needs to speak to the connection server on port 4001.
  • Is the View agent installed?

We’ve created a very basic pool. Next few posts will look whats needed to create an automated Desktop pool using both Windows and Linux. We’ll also look at optimizing the Widows Desktop, including various design and storage considerations,  As well as discussing the various options available in the Desktop Pool wizard.

Linux Desktop – How to Join an Active Directory Domain (general)

Not just for horizon view but since this is part of a series….

Getting Linux desktops to join an active directory domain is now fairly simple, it used to be quite painful and often a bit hit and miss.

Prep work

  • I’ve create a top level OU called Horizon and a nested OU called Virtual_Desktops.
  • A service account has been created called domainjoin, that has the following permissions to the relevant OU
    • Read All Properties
    • Write All Properties
    • Read Permissions
    • Reset Password
    • Create Computer Objects
    • Delete Computer Objects

Here’s the procedure for Centos (RedHat too) and Ubuntu.

Ubuntu 18.04 LTS

  1. Open a terminal and run the following to get the required dependencies. Note that during the krb5-user install your be asked for the domain name. Fill it in in CAPITAL letters.
  2. sudo apt-get update sudo apt-get upgrade sudo apt-get install realmd sssd sssd-tools oddjob oddjob-mkhomedir adcli samba-common krb5-user
  3. Run the pam-auth-update command and select Create Home Directory on Login
  4. The next set of commands creates a computer account in the following Virtual_Desktops OU, nested under Horizon and joins the desktop to the domain.
  5. sudo echo [domainjoin_password] |sudo realm join --computer-ou="ou=Virtual_Desktops,ou=Horizon,dc=port115,dc=com" --user=domainjoin port115.com
  6. Since there is no confirmation you’ve joined the domain correctly run the following command realm list. You’ll get an output stating things like the domain name. If the desktop didn’t join successfully, there’ll be no output.
  7. You should now be able to login using DOMAIN\user

CentOS 7.X

  1. Open a terminal and run the following as root to get the required dependencies. Note that during the krb5-user install your be asked for the domain name. Fill it in in CAPITAL letters.
  2. yum -y update yum -y install realmd sssd oddjob oddjob-mkhomedir adcli samba-common samba-common-tools ntpdate ntp libvirt-client virsh net-destroy default # This might not be nessesary, depending on your base install virsh net-undefine default # This might not be nessesary, depending on your base install service libvirtd restart # This might not be nessesary, depending on your base install systemctl enable ntpd.service ntpdate 0.uk.pool.ntp.org systemctl start ntpd.service 
  3. The next set of commands creates a computer account in the following Virtual_Desktops OU, nested under Horizon and joins the desktop to the domain.
  4.  echo [domainjoin_password] | realm join --computer-ou="ou=Virtual_Desktops,ou=Horizon,dc=port115,dc=com" --user=domainjoin port115.com exit
  5. Since there is no confirmation you’ve joined the domain correctly run the following command realm list. You’ll get an output stating things like the domain name. If the desktop didn’t join successfully, there’ll be no output.
  6. You should now be able to login using DOMAIN\user

Preparing for Horizon View – Setting up the Database – 2 of 2

Part of this Horizon view deployment will be to have the connection server logging its events and a configured view composer server. For this we’ll need two databases.

While I am working with the Express version of MSSQL, the following steps will also apply to other versions of MSSQL (excluding the Linux version). In a production environment you definitively will want to run either standard or enterprise. There is also the developer edition, which is a full featured version for testing and development only.

One quick change before we begin:

  1. Start the Microsoft SQL Server Management Studio.
  2. Select Connect to login.
  3. Right click the server name and select Properties.
  4. Select Security and change the Authentication mode to SQL Server and Windows Authentication Mode and click OK.
  5. Click OK. While you can restart the service to get the new security changes to apply, I usually just reboot the server.


Setting up the Horizon View Events Database and creating the user.

  1. Start the Microsoft SQL Server Management Studio.
  2. Select Connect to login.
  3. Expand the instance, right click on Database and select New Database…
  4. Give the database a name. I chose ViewEvent.
  5. Select Options and make sure the options match the attachment below and click OK.
  6. Expend Security, right click Logins, and select New Login…
  7. Type in  a name for your user (I used ViewEvent). Select SQL Server authentication and type in a password. Unselect Enforce password policy. Change the Default database to ViewEvent or whatever you named you database in step 4.
  8. Select User Mapping. Select the database you created above and in the bottom pane select db_owner.
  9. Click OK and we’ve successfully created the Events database and user. Now onto the composer DB.


Setting up the Horizon View Composer Database and creating the user.

  1. Start the Microsoft SQL Server Management Studio.
  2. Select Connect to login.
  3. Expand the instance, right click on Database and select New Database…
  4. Give the database a name. I chose ViewComposer.
  5. Select Options and make sure the options match the attachment below and click OK.
  6. Expend Security, right click Logins, and select New Login…
  7. Type in  a name for your user (I used viewcomp). Select SQL Server authentication and type in a password. Unselect Enforce password policy. Change the Default database to ViewComp or whatever you named you database in step 4.
  8. Select User Mapping. Select the database you created above and in the bottom pane select db_owner.
  9. Click OK and we’ve successfully created the Composer database and user.

In this part we’ve created the two main DB’s we’ll need for view. So just something to note. In this setup I have used SQL accounts for the databases however in most prod environments that would most likely be heavily discouraged. If you do choose to go down the domain account route then you don’t need to change the authentication mode.

Preparing for Horizon View – Setting up the Database – 1 of 2

Part 1 of 2

In the first part of this post I’ll go though installing SQL express and the SQL Management Studio.

You can download SQL express here and the SQL Management Studio here.

Installing SQL Express 2017

  1. Copy the SQL Express and Management Studio Files across to the Windows server you’ll be using as your DB server. I’m my case the Composer server is going to double as the DB server.
  2. Connect to the windows server with a user that has been granted local administrator rights.
  3. Locate and run the SQL Express installer.
  4. Accept the security challenge. Click Yes.
  5. Click Basic.
  6. You can read the license terms if you like. Click Accept.
  7. Click Install.
  8. Click Close. You can click Install SSMS. It won’t actually install SSMS, It’ll just take you to the page where you can download the installer

Installing SSMS 2017

  1. Locate and run the SSMS Installer.
  2. Accept the security challenge. Click Yes.

  3. Click Install.
  4. The install will take a good few minutes.
  5. Click Close.

Nice and easy.

Next post. Creating and setting up the databases.

Course Review – Docker and Kubernetes

post1

I’d been meaning to look into Docker for a while but never really seemed to find the time. After dithering about for a bit I decided to find a course, something short and to the point.

A bit of googling later and I found a couple of one day courses run by Skippbox, the first course/day was all about Docker and the second was all Kubernetes.

The courses were presented by Sebastian Goasguen, who wrote The Docker Cookbook. Very approachable and knowledgeable. Before the course Sebastian e-mailed me to ask that I install the Docker Toolbox. As I run a Linux desktop with VMware workstation, it didn’t really apply but did send me off looking into the toolbox and what it was all about. It’s basically an installer that aims to get you going with Docker on Windows or a Mac as quickly and as easily as possible by installing Docker Machine, Engine, Compose and as well as Oracle Virtualbox. No support for VMware workstation I see.

Day one (course one): Hello Docker.

The docker course was really interesting, and quite fast. At the beginning of the day Sebastian gave us an introduction the the history of Docker, where it came from, and what problems it could potentially solve in the enterprise. Then on to the basics of downloading our first containers, running, stopping, starting, gearing up  to modifying and editing our own docker files, showing us how to setup our own repo’s,working with networking and security, and then flat out into continuous integration and more. All in I would say it was a very productive day.

Day two(course two): Kubernetes, or as I like to put it, “ Lets dial this up to 11”.

Since we’d all been on the course the day before, we hit the ground running, with a brief overview of the history of Kubernetes. Sebastian provided us with a couple of VM’s running in Digital Ocean and AWS, which we used for remote deployments and orchestration. The course went fast but at no time did I feel like I couldn’t stop and ask for clarification and more detail. Orchestration, clustering, proxying, static routes, resilience, to name a few. It went fast. Toward the end of the day we were working on our own examples that we felt were relevant with Sebastian helping and guiding. He also went on to show us kmachine, which is one of Skippbox’s main focuses.

The two courses were a great introduction into containerisation and what it could do and gives you enough that you can go off and get setup yourself. I really liked Sebastian’s enthusiasm, which pushed me to look more into containers. You can tell he lives and breathes this stuff which made two days much more insightful.

Looking to get into docker? These two courses might be just what you are looking for.